Project Documents Guide
User Guide
BriefSpec
Introduction
Project Documents is the file library for a single project. Use it to store plans, contracts, evidence, presentations, and other working files next to the work they belong to. Folders help you organize. Files keep a version history so a replacement does not lose the earlier copy’s identity.
This guide is for every role that can open Documents on a project. What you can do depends on your Project privileges. Some people can only browse and download. Others can create folders, upload, move, replace versions, and delete. If an action is not available, it is hidden or locked for your role, not missing from the product.
This guide explains how to open Documents, browse folders, search, upload files, manage versions, and keep the document library tidy.
Accessing Documents
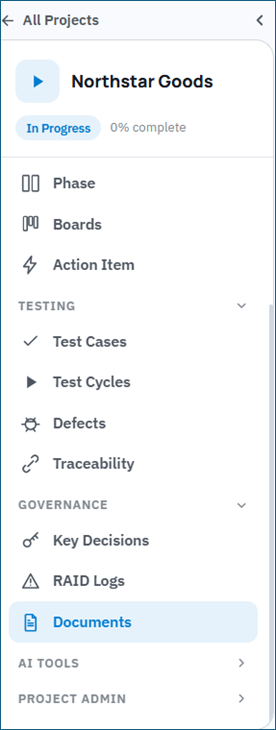
Open a project from All Projects. In the project sidebar, under Governance, select Documents.
The page title is Documents. Below the title is a search field with the placeholder Go to a file or folder. The count on the right shows how many files are in the project.
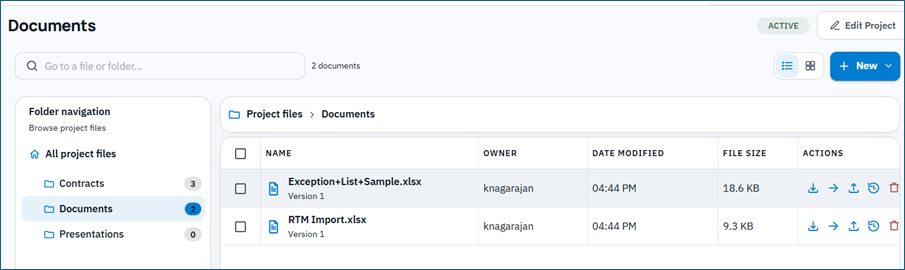
The left column is Folder navigation, with the subtitle Browse project files. All Project files is the top of the library. The right column shows the contents of the folder you have selected.
If Documents is not in the sidebar, it is not enabled on the project template, or your role does not have View access. If you open the page and see You do not have View access to Documents for this project, ask an Application Admin to grant the Documents View privilege.
Before you can use Documents:
- You must be able to open the Project.
- Documents must be available on the Project (Governance in the Project sidebar).
- Your role must have Documents View.
- Upload, folder create, move, version replace, download, activity, and delete each have their own privilege. Your administrator may grant All files or only files you uploaded (Own).
The Empty Project
When a project has no folders or files yet, Folder navigation shows No folders yet. Use New to create one. The main area explains that you can create a folder to organize files, or upload files directly here.
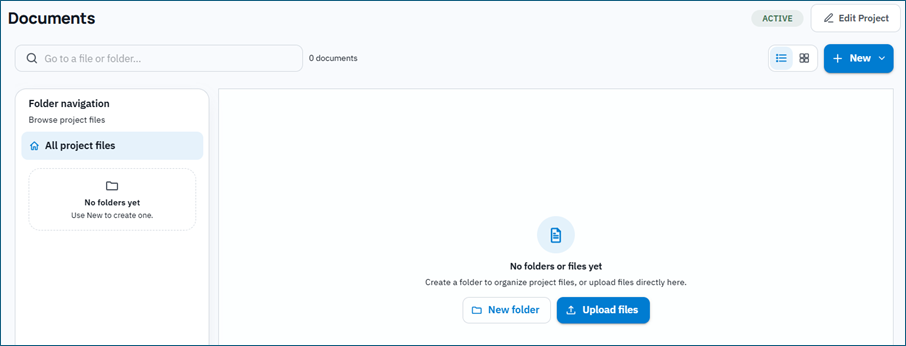
Use New folder to start a structure, or Upload files to place files at the top of the library (All project files). You do not have to create a folder first. Files can sit at the root and be moved later.
Browsing Folders
Select All project files to see everything at the top level. Select a folder in Folder navigation to open it. The breadcrumb above the file list shows the path, for example Project files / Contracts.
Folders can be nested up to five levels. When you are at the deepest level, you can still upload files there, but you cannot create another sub-folder. Use New folder in Project files from the New menu if you need another top-level folder.
Two folders in the same location cannot share the same name.
List and Grid View
Use the list and grid icons in the header to switch how contents are shown. List view is a table with name, owner, modified date, size, and row actions. Grid view shows folders and files as cards. See an image below for the document Grid view.
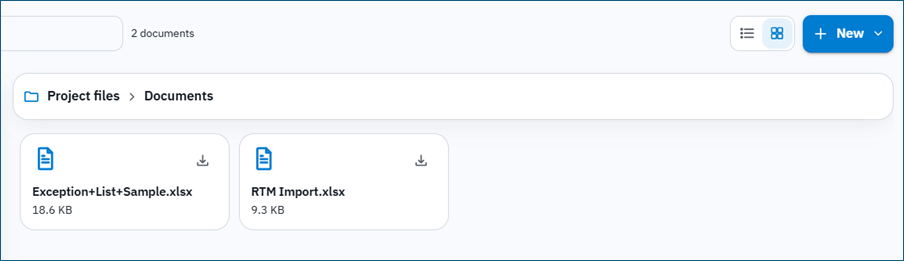
BriefSpec remembers your choice for that project in the current session.
Search
Type in Go to a file or folder. As you type, BriefSpec suggests matching folders and files. Use the arrow keys and Enter to jump to a suggestion. Choosing a folder opens that folder. Choosing a file opens its folder and highlights the file.
Press Enter without picking a suggestion to filter the current list by your text. Clear the search box to see the full folder again.
Creating Folders
If you can add documents, click New, then New folder. The folder is created in the location shown at the top of the menu (Create in …). Enter a name and confirm.
From inside a folder you can also choose New folder in Project files to create a top-level folder without leaving the page. Empty folders can be created first so the team has a place to upload.
Uploading Files
Open the folder where the files should live, then click New and Upload files, or use Upload files on the empty state. You can select more than one file. Files are saved in the current folder.
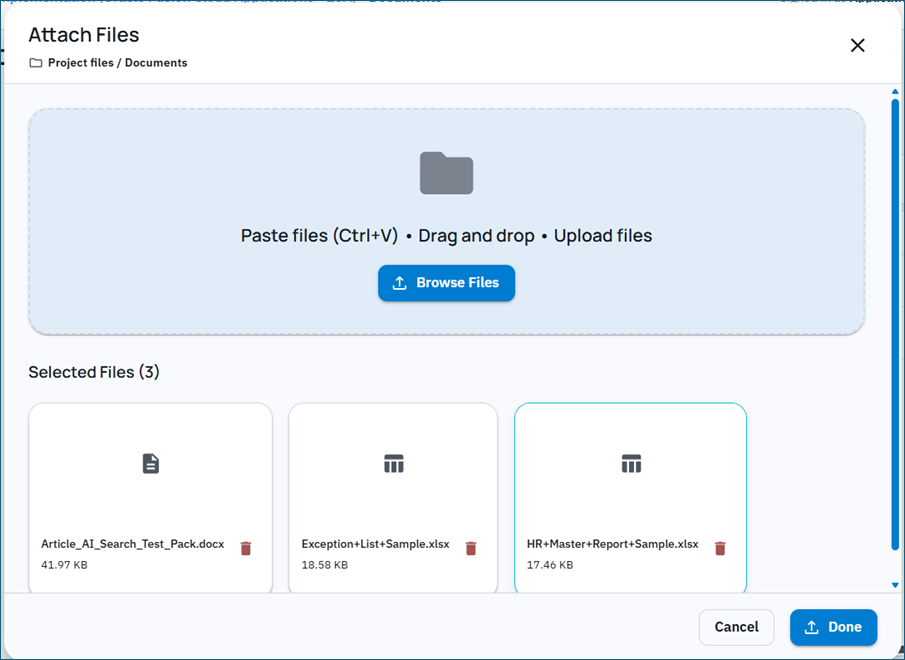
Each file must be 20 MB or smaller. Typical types you can upload include:
- Images: PNG, JPEG, GIF, WebP, BMP
- Documents: PDF, Word (.doc, .docx), Excel (.xls, .xlsx), plain text
- Media: MP3, OGG, MP4, WebM
If a file is too large or the type is not accepted, that file is skipped and BriefSpec tells you which ones failed. Successful files still appear in the folder.
Downloading and Opening Files
Use Download on a file row or card to save a copy to your computer. If Download is not shown, your role does not have the Download privilege, or Own scope limits you to files you uploaded.

Versions
Each file starts at version 1. Use Upload another version on a file to replace the stored file with a new one. The file name in the library stays the same. The version number increases. Use this when a document is revised and you want one place for the current copy, not a second file with a new name.
Version replace is a single-file action. The replacement must also be 20 MB or smaller and an accepted type.
Moving Files and Folders
Use Move on a file to place it in another folder, including All project files. You can select several files and move them together when bulk move is available.
Use Move on a folder to change its parent. Nested folders and files move with it. You cannot move a folder in a way that would go deeper than five levels.
Renaming and Deleting Folders
Rename folder changes only the folder name. The files inside keep their names. You cannot rename a folder to a name that already exists in the same parent.
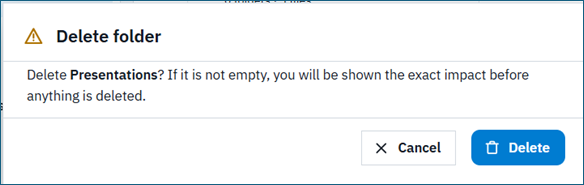
Delete folder asks you to confirm. If the folder has sub-folders or files, BriefSpec tells you how many will be removed. Deleting a folder permanently removes its contents. This cannot be undone.
Deleting Files
Delete on a file permanently removes that file. Confirm when asked. You can select several files and delete them together when bulk delete is available. If some files fail, BriefSpec reports how many succeeded and how many could not be deleted.
If your privilege is Own, you can delete only files you uploaded. Folders can be renamed, moved, or deleted only by the person who created them when Own scope applies.
File Activity
View activity on a file shows a timeline of what happened to that file: upload, version replace, download, move, and delete events, with who did them and when. If you do not see View activity, your role does not have the Activity privilege.
What You Can Do Depends on Your Role
Documents privileges on the project control the buttons you see:
- View — open the Documents page and browse folders and files you are allowed to see.
- Add — create folders and upload files.
- Update — move files, upload another version, and rename or move folders you are allowed to change.
- Download — save a copy of a file.
- Activity — open the file activity timeline.
- Delete — remove files or folders.
Read means you can see the action area but cannot change files. Hidden means the action is not offered. Own means the action applies only to files you uploaded (or folders you created). Hover a disabled button to see why it is locked.
Important: Always confirm you are in the correct folder before you upload or delete. File delete and folder delete cannot be undone. Prefer Upload another version when you are revising an existing document, so the library stays one file per document.