Project Templates Guide
User Guide
BriefSpec
1. Introduction
Project Templates (also called Module Configuration Templates) define how your BriefSpec tenant and projects behave across modules such as Backlog, Defects, Test Cases, Service Requests, Phases, and the Analytics Dashboard. Templates control which modules are active, how record forms are laid out, which status values are available, and which optional features are turned on.
This guide explains System Templates and Custom Templates, how to create and maintain templates, how templates connect to projects, and which users can view or change template settings.
Navigate to Settings -> Project Templates
Figure 1: Settings landing page showing the Project Templates card
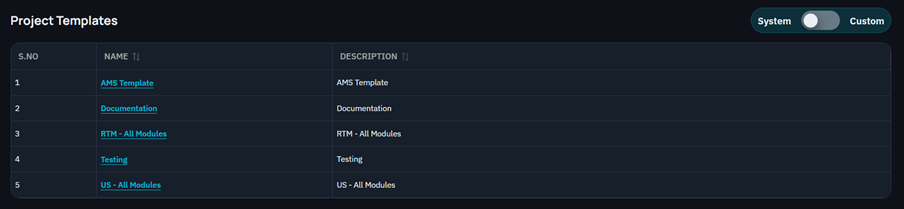
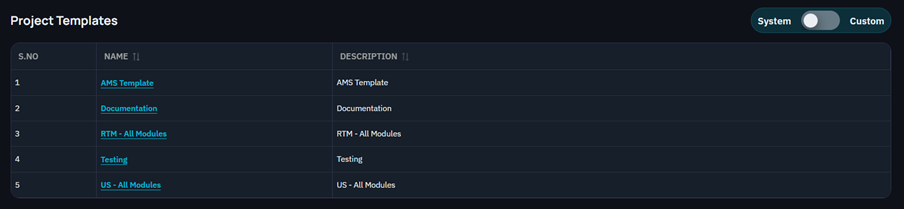
2. Overview of Project Templates
What a template controls
- Active modules – which product areas are available in a project (for example Backlog, Defects, Test Cycles, Service Requests).
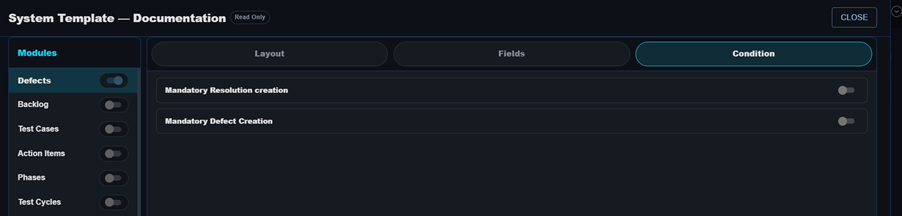
For example, in the Documentation template, the Defects module is Active, but the Backlog module is inactive.
- Form layout – system sections (read-only) plus a Custom Layout section where you can add custom fields.
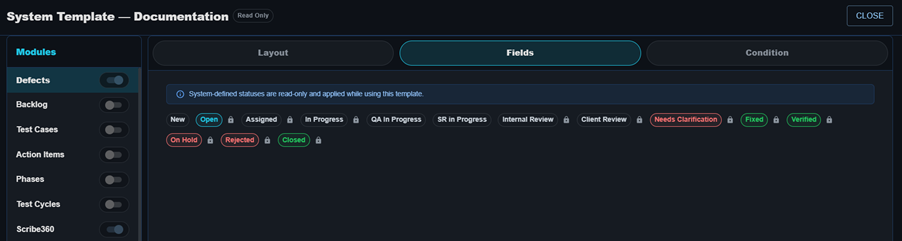
For example, see above how the fields are laid out in the Defects module in the Documentation template.
- Status options – workflow statuses for modules that support status (for example Defects, Action Items, Service Requests).
- Special fields – feature toggles such as mandatory defect creation, requirement form type (RTM vs User Story), dashboard widget visibility, and test-cycle attestation rules.
- Project workspace tabs – the active template drives which tabs and dashboard widgets users see inside a project.
Template types at a glance
- System Templates – platform-provided blueprints shipped by BriefSpec. Read-only reference catalog.
- Custom Templates (global) – tenant-owned templates managed under Settings. Used when creating projects and reused across projects.
- Project-scoped templates – a Draft copy created automatically when a project is saved with a selected template. Named like PRJ000104 – RTM – All Modules.
3. System Templates
Purpose
System Templates are predefined starting points maintained by BriefSpec. They show the recommended module mix and default configuration for common engagement types. You cannot edit system templates directly; you clone them to create Custom Templates.
Shipped system templates
BriefSpec includes these system blueprints (names may appear exactly as shown in the UI):
- RTM – All Modules – full module set with Backlog requirement form set to RTM.
- US – All Modules – full module set with Backlog requirement form set to User Story.
- AMS Template – focused on Application Managed Services / maintenance projects, with recurring support activities rather than full project delivery phases.
- Testing – focused on test execution (Projects, Defects, Test Cases, Test Cycles, Scribe360, Analytics Dashboard).
- Documentation – documentation-oriented module mix similar to AMS.
What you can do with system templates
- Browse the catalog under Settings > Project Templates with the System toggle selected.
- Open a template name to preview modules, fields, statuses, and special fields in read-only mode.
- Use a system template as the Clone From source when creating a new Custom Template.
- Select a system template when creating a new project (Project Template field on the project form).
What you cannot change on system templates
- Template name, module on/off settings, sections, fields, and special field defaults.
- System templates cannot be deleted or created by tenant users through the application UI.
Note: Platform administrators may update limited metadata (description, active flag, published status) outside normal tenant workflows. Tenant users always experience system templates as read-only.
Figure 2: System Templates list with Read Only detail dialog
4. Custom Templates
Purpose
Custom Templates belong to your tenant. They let you standardize delivery across projects while tailoring modules, custom fields, statuses, and special toggles to your organization process.
Global vs project-scoped custom templates
- Global custom templates appear in Settings > Project Templates (Custom toggle) and in the project creation dropdown when Published and Active.
- Project-scoped templates are linked to one project. They are created when you save a project with a template selection. Names follow the pattern: {Project ID} – {Source Template Name}.
- Project-scoped templates can be edited while Draft. After Publish, structural editing is locked for that project copy.
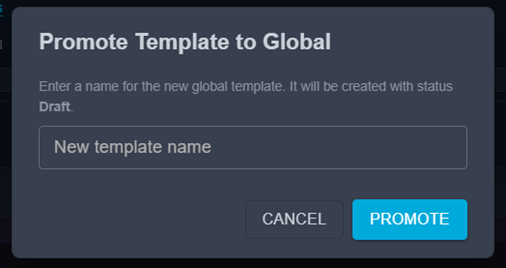
- Use Promote to Global on the project form to copy a successful project template into Settings as a new global Draft template.
Custom template lifecycle
- Status: Draft or Published.
- Active flag: Active templates can be assigned to new projects; Inactive templates remain in Settings but are hidden from project assignment lists.
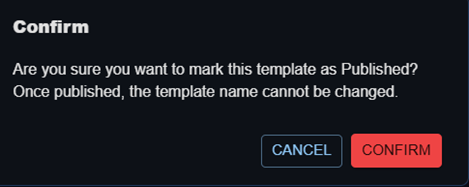
- Publishing warning: Once a template is Published, its name cannot be changed.
- Delete rules: Only Draft templates with no linked projects can be deleted.
- Inline edit rules: If a Published template is linked to one or more projects, name and status cannot be edited from the list view.
Figure 3: Custom Templates list showing Draft/Published, Active toggle, and Linked Projects

5. Accessing Project Templates
From Settings (primary path)
- Open the sidebar and click Settings (gear icon).
- On the Settings page, click the Project Templates card.
- You arrive at the Project Templates screen with System and Custom toggles.
Breadcrumb trail: Home > Settings > Project Templates.
From project workflows
- Create Project / Edit Project – Step 1 includes Project Template (System or Custom source).
2. Manage Projects – Change Project Template action on a project row (when permitted).
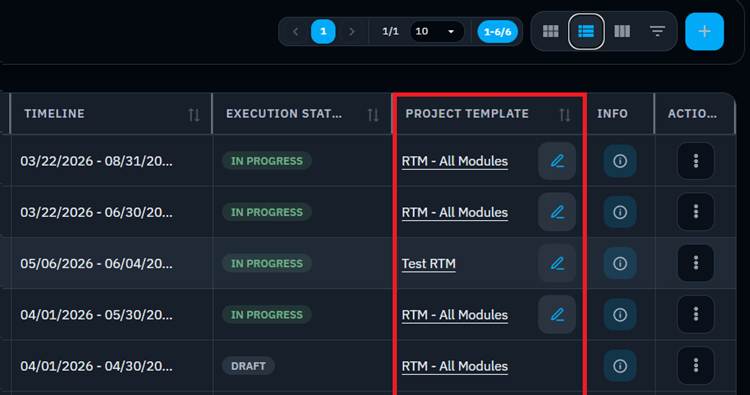
- Inside a project – tabs and dashboard widgets reflect the active project template modules and special fields.
Prerequisites
- Your role must include access to Settings > Project Templates (see Section 12).
- Your subscription plan must allow the number of custom templates and custom fields you need (see Section 13).
6. Creating a New Custom Template
From Settings
- Go to Settings > Project Templates.
- Switch the toggle to Custom.
- Click the Add (+) button (requires create permission and available plan quota).
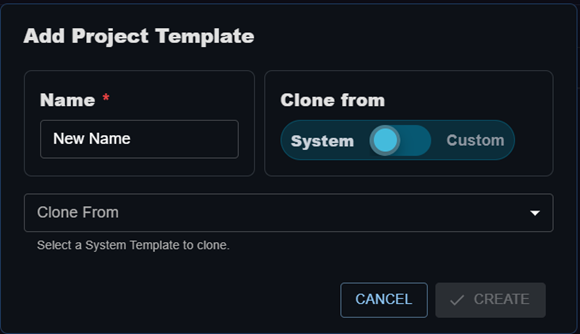
- In the Add Project Template dialog, enter a Template Name (required).
- Choose clone source type – System (default) to clone from a system blueprint, or Custom to clone from an existing tenant template.
- Select Clone From (required) and click Create.
- The new template appears in the list as Draft and Active by default.
- Click the template name to open the detail editor and configure modules.
Indirect creation via projects
- When you create or edit a project and select a System or Published Custom template, BriefSpec creates a project-scoped Draft copy on save.
- Customize that copy from the project edit screen by clicking the linked template name (after the project is saved).
- Optionally click Promote to Global to save the project configuration as a reusable global Custom Template.
Validation during create
- Template name is required and must be unique within your tenant for global templates.
- Clone From selection is required.
- Cloning may fail if the combined custom fields across active templates would exceed your plan limit.
Figure 4: Add Project Template dialog
7. Configuring a Template (Detail Editor)
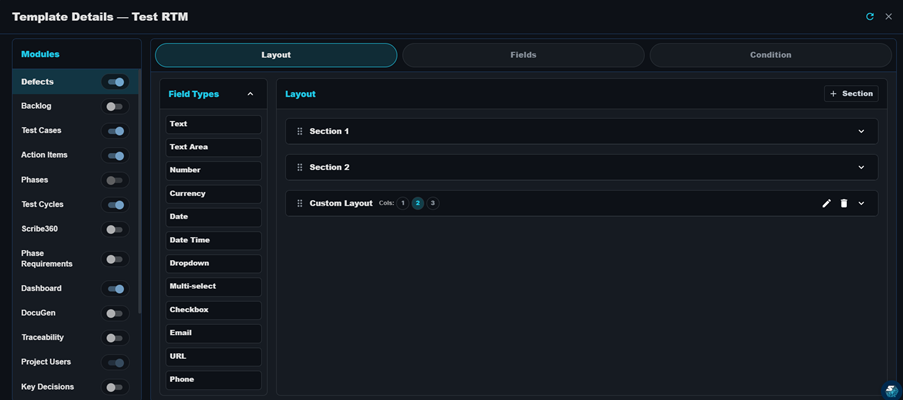
Click a Custom Template name (or a project-scoped template from a project) to open the detail dialog. The left panel lists modules; the right panel shows configuration tabs for the selected module.
Module list
- Toggle modules on or off using the activation switch (subject to dependency rules in Section 8).
- Inactive modules show a message and cannot be configured until activated.
- Project Users module activation cannot be toggled.
- Some modules show “Customisation is not allowed for this module” on the Fields tab (see Section 10).
Fields tab
Each module uses up to three sections:
- Section 1 and Section 2 – system-defined, read-only layout. Fields appear with a lock icon; you can preview but not edit, reorder, or delete them.
- Custom Layout – editable section where you add custom fields using the field palette.
- Drag and drop to reorder fields within editable sections.
- Add sections is only available in editable areas; new sections are always editable.
Available custom field types
- Text, Text Area, Number, Currency, Date, Date Time, Dropdown, Multi-select, Checkbox, Email, URL, Phone.
Status tab
- View system-provided statuses and any custom statuses you add for the module.
- System statuses may be locked (cannot edit or delete) when the platform marks them as non-editable.
- Custom status labels must be at least 3 characters, use letters and spaces only, and must be unique within the module.
- If a status value is already in use on live records, changing or removing it may be blocked.
Special Fields tab
- Configure module-level toggles and single-select options that control product behavior.
- Examples: mandatory defect creation (Defects), requirement form RTM vs User Story (Backlog), mandatory requirement link on test cases (derived from Backlog activation), mandatory attestation (Test Cycles).
- Dashboard module includes additional Condition / widget visibility controls for Analytics Dashboard tabs and widgets.
Saving changes
Changes save through the template editor actions. If editing is locked (Published project-scoped template or data lock), save controls are disabled and a banner explains why.
8. Module Dependencies and Activation Order
Several modules depend on one another. BriefSpec enforces these rules when you activate or deactivate modules in a template:
Dependency chain
- Backlog is the parent of Phases and Phase Requirements.
- Backlog and Phases together enable Traceability.
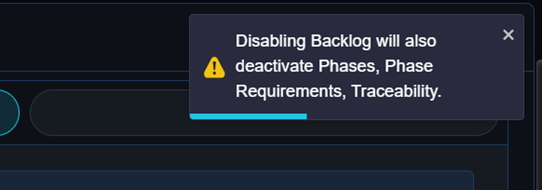
- Disabling Backlog automatically disables Phases, Phase Requirements, and Traceability (with a warning).
- Disabling Phases disables Phase Requirements and Traceability.
- You cannot enable a dependent module unless its parent module(s) are active.
Special field coupling
- When Backlog is deactivated, related special fields and Test Cases mandatory requirement link behavior update automatically.
- The Backlog requirement_form special field (RTM vs User Story) may become locked once backlog data exists in linked projects.
Figure 5: Module dependency warning when deactivating Backlog
9. Draft vs Published Templates
Draft templates
- Safe workspace for structural changes (modules, sections, fields, statuses, special fields).
- Can be deleted if not linked to projects.
- Project-scoped Draft copies are tied to their project for customization before publish.
Published templates
- Global Published templates: structural editing remains allowed in Settings, but the template name is locked.
- Project-scoped Published templates: all structural editing is disabled. Message shown: “This template is Published – editing is disabled.”
- Cannot delete a Published template.
- Cannot revert Published to Draft if any project uses the template directly or through clone lineage.
- Only Published and Active global custom templates appear in the project creation template dropdown.
Publishing steps
- From the Custom Templates list, edit the Status column (inline edit) or open the template and set status to Published.
- Confirm the dialog: Once published, the template name cannot be changed.
- Verify Linked Projects count if you need to know impact before publishing.
Figure 6: Publish confirmation dialog
10. What Can and Cannot Be Updated
System templates (tenant users)
- Can: view catalog, preview all tabs, clone into Custom Templates, select when creating projects.
- Cannot: rename, change modules, edit fields, statuses, or special fields.
Global custom templates
- Can (Draft): full structural edit, delete (if no linked projects), rename, activate/deactivate.
- Can (Published): continue structural edits in the detail editor; rename is blocked; delete is blocked; cannot revert to Draft if linked to projects.
- Cannot: delete when Published; change name after publish; inline edit name/status when Published and linked to projects.
Project-scoped custom templates
- Can (Draft): same structural edits as global Draft templates for that project.
- Can (Published): view only – all module, field, status, and special field edits are locked.
- Promote to Global: creates a new global Draft template; does not modify the project-scoped copy in place.
Data lock (layout protection)
When linked projects contain live data in sensitive modules, BriefSpec locks layout editing for those modules even if the template is still Draft.
Locked modules include:
Defects, Backlog, Action Items, Phases, Phase Requirements, Service Requests.
When data lock applies you may see layout locked messaging. Changing or removing fields with stored values is blocked.
Modules with Fields tab customization blocked
The Fields tab does not allow layout customization for these modules (Status and Special Fields tabs may still apply where enabled):
Test Cases, Test Cycles, Scribe360, DocuGen, Project Users, Dashboard (Analytics Dashboard), Traceability, Key Decision(s), RAID Log(s).
System sections vs Custom Layout
- System sections (Section 1, Section 2): never editable.
- Custom Layout: only location for adding, editing, reordering, or deleting custom fields.
- Sections with stored data: only safe metadata edits (section name, display order, fields per row) may be allowed; deleting sections with data is blocked.
11. Templates and Projects
Selecting a template when creating a project
- Project Template is required on the create project form.
- Choose System or Custom as the source type.
- For Custom, only Published and Active global templates appear (project-scoped names like PRJ### – … are excluded from the dropdown).
- On save, BriefSpec creates a project-scoped Draft template linked to the project.
Changing template source on an existing project
- You may change System/Custom source and template selection only while the project execution status is Draft.
- After execution begins, template source changes are blocked to protect project data integrity.
- Use Change Project Template from Manage Projects when the action is available for your role and project state.
Viewing and editing the project template
- On Edit Project, click the linked template name to open the detail editor for the project-scoped copy.
- Before the project is first saved, template details may prompt you to save the project first.
Promote to Global
- Available from the project edit screen when a project-scoped template exists.
- Enter a new global template name (must not already exist as a global template).
- Creates a Draft global Custom Template copy for reuse on future projects.
Runtime effects inside a project
- Project tabs (Backlog, Phases, Defects, Service Requests, etc.) appear based on active modules in the project template.
- Dashboard widgets and tabs follow Dashboard special field and condition settings.
- Record forms render system fields plus custom fields from Custom Layout.
- Status dropdowns on records use template-scoped status options.
Figure 7: Create Project – Project Template selection
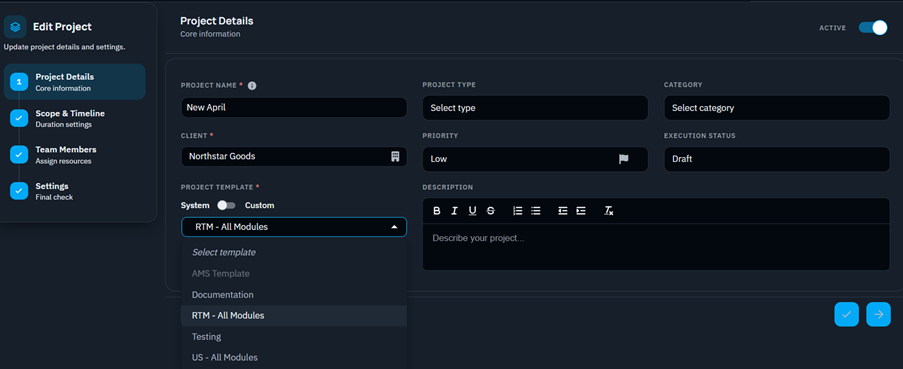
Figure 8: Promote to Global dialog
12. Role-Based Access
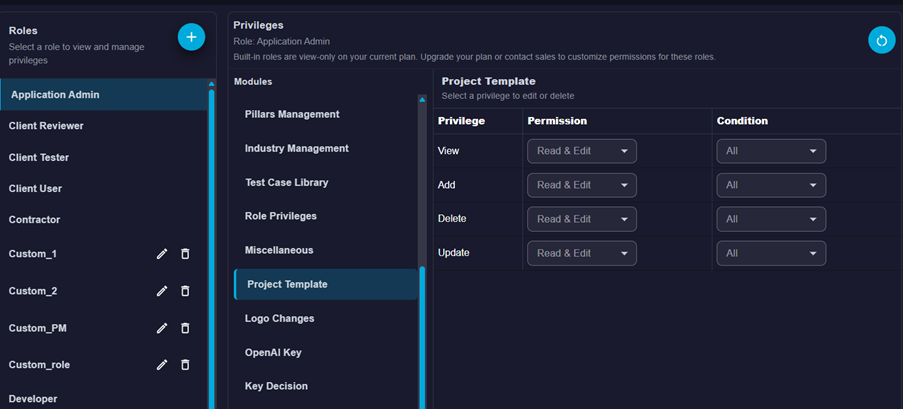
Template permissions are configured per tenant role under Settings > Role Privileges. BriefSpec does not hardcode job titles; your administrator assigns privilege levels to each role.
Privilege keys
- settings-project-template – controls visibility of the Project Templates card on Settings.
- project-template-view – required to open the Project Templates page; without it you see a permission denied message.
- project-template-add – controls visibility and ability to use the Add (+) button and create templates.
- project-template-update – controls inline edit, Active toggle, and detail editor save actions.
- project-template-delete – controls delete action on Draft templates.
Privilege levels
- Hidden – feature not visible.
- Read – controls and buttons may appear but create/edit/delete actions are disabled.
- Read and Edit – full action enabled for that privilege.
Typical access patterns
Exact mapping depends on your tenant configuration. Common patterns:
- Tenant administrators and application admins – full template management under Settings.
- Project managers and test managers – may view templates and project-scoped copies; edit rights vary by role.
- Authors, testers, and client users – usually view templates and project structure; rarely create global templates.
Project-level actions
- Creating projects and selecting templates requires project creation permissions (separate from template privileges).
- Promote to Global and Change Project Template require both project management and template update rights where applicable.
Figure 9: Role Privileges – Project Template privileges
13. Subscription Plan Limits
Even with role privileges, your subscription plan may cap template usage.
Custom template count
- Plan metric: no_of_custom_templates.
- When the limit is reached, the Add button shows a plan limit message and creation is blocked.
- Contact your BriefSpec representative to increase the limit.
Custom field count
- Plan metric: no_of_custom_fields_for_template.
- Counts custom fields added in Custom Layout sections across active custom templates (system section fields do not count).
- Adding fields or cloning a template may fail when the limit would be exceeded.
- After a plan downgrade, excess custom templates may become read-only until you are within limits.
Module entitlements
- Some modules appear in the template editor only if your plan includes them (for example DocuGen, Service Requests, Traceability).
- Plan module entitlements filter the module list in the detail editor.
14. Status Options Reference
Modules with status support expose a Status tab in the template editor.
System vs custom statuses
- System statuses are seeded by BriefSpec (for example Action Items: Open, In Progress, Client Review, Closed). Some are locked and cannot be edited or deleted.
- Custom statuses are created by your tenant for a specific template and module.
- Phase Requirements may use multiple status dimensions (for example build status and review status) via status context.
Rules when managing statuses
- Duplicate labels within the same module and template are rejected.
- You cannot create a custom status whose label duplicates an existing system status label.
- Deleting or changing a status that is in use on live records may be blocked.
15. Special Fields Reference
Special fields are module-level configuration toggles (not form fields on individual records).
Common special fields
- Defects – mandatory_defect_creation (Boolean): when enabled, defect creation rules apply per module configuration.
- Backlog – requirement_form (Single select: RTM or User Story): drives backlog/requirement artifact type for the project.
- Test Cases – mandatory_requirement_link (Boolean): automatically tied to whether Backlog module is active.
- Test Cycles – mandatory_attestation (Boolean): controls attestation requirements on test cycles.
- Analytics Dashboard – multiple widget and tab visibility toggles configured under Special Fields and Condition tabs.
Editing rules
- Special fields follow the same Published and data-lock rules as other template structure.
- Backlog requirement_form may lock after backlog records exist in linked projects.
16. Custom Fields on Live Records
Custom fields defined in a template Custom Layout appear on create/edit forms for that module inside projects using the template.
How values are stored
- When users save Defects, Service Requests, Backlog items, Action Items, and other supported modules, values for custom fields are stored against the record.
- Once values exist, the template may lock field definition changes to protect data integrity.
Supported modules for custom layout fields
Custom fields are commonly used on modules such as Defects, Service Requests, Backlog, Action Items, and Phases. Modules listed in Section 10 as customization-blocked do not support Fields tab layout changes.
17. Common Messages and Troubleshooting
- You do not have permission to view this screen – your role lacks project-template-view; ask an administrator to update Role Privileges.
- Once published, the template name cannot be changed – expected after publishing; clone to a new Draft template if you need a different name.
- This template is Published – editing is disabled – applies to project-scoped Published templates; use Promote to Global or edit while still Draft.
- Published template cannot be deleted – unpublish is not allowed when projects are linked; retire by setting Inactive instead.
- Customisation is not allowed for this module – module is in the blocked list; use Status or Special Fields tabs if available.
- Maximum custom fields or custom templates on your plan – upgrade plan or remove unused custom fields/templates.
- Module activation blocked – enable parent modules first (see Section 8).
- Template selection disabled on edit project – project execution status is no longer Draft.
- Layout locked or data lock – live project data exists; create a new template copy or Promote to Global for a greenfield configuration.
18. Recommended Practices
- Start from the system blueprint closest to your engagement type (RTM, US, Testing, AMS, or Documentation).
- Configure and test a Draft global template before publishing and assigning to many projects.
- Use descriptive template names that indicate module mix and requirement type (for example ACME – US Delivery – Standard).
- Publish only when the template is ready for project assignment; remember name lock after publish.
- Use project-scoped Draft copies to experiment on a single project before Promote to Global.
- Set templates Inactive rather than deleting when retiring a configuration that may still be referenced historically.
- Coordinate status and special field changes with project managers before applying to Published global templates used by active projects.
- Review plan limits for custom templates and custom fields before large rollout.
Appendix
The following appendices provide detailed reference material. Each section identifies its target audience so you can find content relevant to your role.
Appendix A: Quick-Reference Tables
A.1 System Template Comparison Matrix
Target audience: Tenant administrators, project managers, and template owners choosing a starting blueprint.
Legend: On = module active by default in the system blueprint; Off = inactive. RTM/US templates include extended modules (DocuGen, Traceability, Project Users, Key Decisions, RAID Logs, Documents, Service Requests) when enabled on your plan.
Core modules (seed configuration)
- RTM – All Modules: All core modules On. Backlog requirement_form = RTM.
- US – All Modules: All core modules On. Backlog requirement_form = User Story.
- AMS: Projects, Defects, Scribe360, Analytics Dashboard On; Backlog, Test Cases, Action Items, Phases, Test Cycles, Phase Requirements Off. Backlog requirement_form = None.
- Testing: Projects, Defects, Test Cases, Scribe360, Analytics Dashboard On; Backlog, Action Items, Phases, Test Cycles (seed), Phase Requirements Off. Note: platform sync may keep Defects, Test Cases, Test Cycles active on Testing template.
- Documentation: Same module mix as AMS in seed data.
Typical use cases
- RTM / US – All Modules: Full implementation and testing engagements.
- AMS / Documentation: Support, documentation, and defect tracking without full backlog/phases.
- Testing: Test execution-focused projects.
A.2 Module Catalog
Target audience: All users who need to understand which project areas a template controls.
Modules appear in the template detail editor when visible on your plan. Scope indicates where the module applies.
- Backlog (ProjectWorkspace) – Requirements/user stories or RTM items; Fields, Status, Special Fields.
- Phases (ProjectWorkspace) – Delivery phases; Fields, Status.
- Phase Requirements (ProjectWorkspace) – Requirements within phases; Status (may include build/review contexts).
- Defects (ProjectWorkspace) – Defect tracking; Fields, Status, Special Fields.
- Test Cases (ProjectWorkspace) – Test case management; Status, Special Fields (Fields tab blocked).
- Test Cycles (ProjectWorkspace) – Test execution cycles; Status, Special Fields (Fields tab blocked).
- Action Items (ProjectWorkspace) – Action item tracking; Fields, Status.
- Service Requests (ProjectWorkspace) – Service request management; Fields, Status.
- Scribe360 (ProjectWorkspace) – Session recording; Special Fields only (Fields tab blocked).
- DocuGen (ProjectWorkspace) – Document generation; Fields tab blocked.
- Traceability (ProjectWorkspace) – Traceability views; Fields tab blocked.
- Analytics Dashboard / Dashboard (ProjectWorkspace) – Project dashboard; Special Fields and Condition tabs (Fields tab blocked).
- Project Users (ProjectWorkspace) – Project team; Fields tab blocked; activation toggle locked.
- Key Decisions (ProjectWorkspace) – Key decision log; Fields tab blocked in UI.
- RAID Logs (ProjectWorkspace) – RAID log; Fields tab blocked in UI.
- Documents (ProjectWorkspace) – Project documents when enabled on plan.
- Projects (Project) – Hidden from template editor (is_visible=false); always part of catalog.
A.3 Privilege Matrix
Target audience: Tenant administrators configuring Role Privileges; template owners verifying access.
Privilege levels: Hidden (not visible), Read (view controls, actions disabled), Read and Edit (full action).
- settings-project-template – Shows Project Templates card on Settings. Audience: anyone accessing Settings.
- project-template-view – Open Project Templates page. Hidden = permission denied message.
- project-template-add – Add (+) button and create templates. Read = button visible but disabled.
- project-template-update – Inline edit, Active toggle, detail editor saves. Read = controls visible but disabled.
- project-template-delete – Delete Draft templates. Read = delete icon visible but disabled.
- Project create/edit and Promote to Global require separate project-management privileges in addition to template privileges.
A.4 Editability Matrix
Target audience: Template owners and project managers planning changes; support staff diagnosing locked templates.
System template (tenant UI)
Name: No | Modules: No | Sections/fields: No | Statuses: No | Special fields: No | Delete: No
Global custom – Draft
Name: Yes | Modules: Yes | Custom Layout: Yes | Statuses: Yes | Special fields: Yes | Delete: Yes (if no linked projects)
Global custom – Published
Name: No | Modules: Yes | Custom Layout: Yes (unless data lock) | Statuses: Yes | Special fields: Yes | Delete: No | Revert to Draft: No if projects linked
Project-scoped – Draft
Same as global Draft for that project copy.
Project-scoped – Published
All structural edits: No (full edit lock banner). View and Promote to Global still available.
Data-locked module (any scope)
Layout/fields: Locked when linked projects have live data in Defects, Backlog, Action Items, Phases, Phase Requirements, or Service Requests.
A.5 Module Dependency Cheat Sheet
Target audience: Template owners activating or deactivating modules.
- Backlog OFF forces OFF: Phases, Phase Requirements, Traceability.
- Phases OFF forces OFF: Phase Requirements, Traceability.
- Traceability requires: Backlog ON and Phases ON.
- Phase Requirements requires: Backlog ON and Phases ON.
- Enabling a child without its parent is blocked with an explanatory message.
- Test Cases mandatory_requirement_link special field auto-syncs with Backlog active state.
A.6 Customization-Blocked Modules List
Target audience: Template owners attempting Fields tab edits; support explaining UI restrictions.
On the Fields tab, these modules display Customisation is not allowed for this module. Status and Special Fields tabs may still be available where enabled:
- Test Cases
- Test Cycles
- Scribe360
- DocuGen
- Project Users
- Dashboard / Analytics Dashboard
- Traceability
- Key Decision(s)
- RAID Log(s)
Appendix B: Field and Configuration Reference
B.1 Custom Field Type Reference
Target audience: Template owners adding fields in Custom Layout; business analysts defining capture requirements.
- Text – Single-line text; label max 60 characters.
- Text Area – Multi-line text.
- Number – Numeric values.
- Currency – Monetary amounts.
- Date – Date only (MM-DD-YYYY display in UI).
- Date Time – Date and time.
- Dropdown – Single selection from defined options.
- Multi-select – Multiple selections from defined options.
- Checkbox – Boolean yes/no.
- Email – Email format validation.
- URL – Web address validation.
- Phone – Phone number validation.
- Placeholder text max 60 characters. Field labels must be unique within a module linkage.
B.2 System Layout vs Custom Layout
Target audience: Template owners and business analysts distinguishing locked vs editable form areas.
Section 1 and Section 2 (system sections)
- Created automatically per module; is_editable = false.
- Contain platform-defined baseline fields (see Appendix B.3).
- Shown with lock icons; cannot add, edit, reorder, or delete fields.
Custom Layout (editable section)
- Third default section; is_editable = true.
- Only location for tenant custom fields via the field palette.
- Custom fields here count toward no_of_custom_fields_for_template plan limit.
- Additional editable sections can be added; all new sections are editable.
B.3 Baseline System Fields by Module
Target audience: Business analysts, template owners, and project managers reviewing default form layouts.
Baseline system fields (Section 1 and Section 2) from the platform reference layout. These are preview-only in the template editor.
Defects
- Section 1: Status, Priority, Severity, Due Date, Assigned To, Test Case ID
- Section 2: Title, Description, Attachments
Service Requests
- Section 1: Status, Request Type, Priority, Severity, Due Date, Requester, Source, Pillar, Module / Epic, Assigned To, Estimated Hours, Actual Hours, Billing
- Section 2: Title, Description, Attachments
Backlog
- Section 1: Source, Status, Fit Status, Hierarchy, Solution Type, Software, Module/Epic, Tags, Client Reviewer
- Section 2: Title, Description, Acceptance Criteria, Notes
Action Items
- Section 1: Status, Priority, Flag, Due Date, Assignee, Software, Module, Phase, Requirement ID
- Section 2: Action Title, Description, Resolution Summary
Phases
- Section 1: Phase Name, Status, Predecessor, Start Date, End Date, Duration, Tags
- Section 2: Goal
Test Cases
No baseline system field sections defined in reference layout (Fields tab may be blocked).
Test Cycles
No baseline system field sections defined in reference layout (Fields tab may be blocked).
B.4 Special Fields Catalog
Target audience: Template owners configuring module behavior; project managers understanding RTM vs User Story and defect rules.
- Defects – Mandatory Defect Creation (Boolean, default false): Controls mandatory defect creation behavior.
- Backlog – Requirement Form (Single select: RTM or User Story, default RTM): Sets backlog artifact type for the project.
- Test Cases – Mandatory Requirement Link (Boolean, default true): Automatically set to match whether Backlog module is active; not freely set when Backlog is off.
- Test Cycles – Mandatory Attestation (Boolean, default true in master catalog): Controls attestation requirements on test cycles.
- Special field values can lock after live data exists (e.g. Backlog requirement_form when backlog records exist in linked projects).
B.5 Status Options Catalog
Target audience: Template owners and workflow administrators managing module statuses.
Action Items – system statuses (all locked: cannot edit or delete in tenant UI)
Open, In Progress, Needs Clarification, Internal Review, Client Review, Approved, Rejected, On Hold, Closed.
Other modules
- Defects (reference layout): Open, In Progress, Resolved, Closed, Reopen.
- Service Requests (reference layout): Open, In Progress, Resolved, Closed.
- Backlog (reference layout): Draft, In Review, Approved, Rejected.
- Phases (reference layout): Not Started, In Progress, Completed, On Hold.
- Phase Requirements: may use status_context dimensions (e.g. build_status, review_status).
Custom status rules
- Label: letters and spaces only, minimum 3 characters, maximum 60.
- No duplicate labels within the same module and template.
- Cannot duplicate a system status label when creating a custom status.
B.6 Dashboard Condition and Widget Keys
Target audience: Template owners configuring Analytics Dashboard visibility; project managers understanding missing widgets.
Analytics Dashboard Condition tab controls visibility of dashboard tabs and widgets. Keys below map to toggles in the template editor.
- Overview Tab – overall_project_health: Widget or tab visibility toggle
- Overview Tab – productivity_boost: Widget or tab visibility toggle
- Overview Tab – requirements_mapping: Widget or tab visibility toggle
- Overview Tab – testing_status: Widget or tab visibility toggle
- Overview Tab – requirements_analysis: Widget or tab visibility toggle
- Overview Tab – phase_analysis: Widget or tab visibility toggle
- Overview Tab – test_case_analysis: Widget or tab visibility toggle
- Overview Tab – defect_analysis_mode: Widget or tab visibility toggle
- Overview Tab – defect_analysis_mode_vs_status: Widget or tab visibility toggle
- Overview Tab – test_cycle_execution_status: Widget or tab visibility toggle
- Overview Tab – time_metrics: Widget or tab visibility toggle
- Overview Tab – effort_distribution: Widget or tab visibility toggle
- Predictive Tab – project_health_score: Widget or tab visibility toggle
- Predictive Tab – delay_probability: Widget or tab visibility toggle
- Predictive Tab – approval_lag: Widget or tab visibility toggle
- Predictive Tab – defect_spillover_risk: Widget or tab visibility toggle
- Predictive Tab – primary_risk_drivers: Widget or tab visibility toggle
- Predictive Tab – timeline_risk_overlay: Widget or tab visibility toggle
- Predictive Tab – Recommended Actions: UI placeholder
- Predictive Tab – module_health_overview: Widget or tab visibility toggle
Appendix C: Lifecycle, Naming, and Workflows
C.1 Template Lifecycle
Target audience: Tenant administrators and template owners managing Draft/Published and Active/Inactive states.
- Draft –> Published (name locks on publish)
- Active <–> Inactive (controls project assignment eligibility)
- Project-scoped copy: created on project save (always starts Draft)
- Published project-scoped: structural edit lock applies
- Promote to Global: project-scoped –> new global Draft (testing_project cleared)
- Delete: only Draft, no linked projects.
- Revert Published to Draft: blocked if any project uses template or clone lineage.
C.2 Naming Conventions
Target audience: Template owners and project administrators maintaining a consistent template library.
- Global custom templates: free-form name chosen at create (unique per tenant).
- Project-scoped templates: auto-named {Project ID} – {Source Template Name} (e.g. PRJ000104 – RTM – All Modules).
- Promote to Global: you supply a new global name; must not duplicate an existing global template name.
- Recommended: include client, engagement type, and requirement form in global names for clarity.
C.3 Decision Tree: How to Create a Template
Target audience: New tenant administrators setting up their first template library.
- Need a standard org-wide starting point? Clone a System Template in Settings > Custom > Add.
- Need a variant of an existing tenant template? Clone Custom from the existing template.
- Need to experiment on one project first? Select template on project create, customize project-scoped Draft, then Promote to Global.
- Need a quick one-off project layout? Use project-scoped copy only; skip global publish until validated.
- Cannot create new global template? Check plan limit (Appendix D.1) and project-template-add privilege (Appendix A.3).
C.4 Scenario Playbooks
Target audience: Tenant administrators and delivery leads executing common template rollout tasks.
Playbook 1: Standardize a new delivery model for all projects
1. Clone closest System Template to new global Draft.
2. Configure modules, Custom Layout fields, statuses, special fields.
3. Test on one pilot project (assign Draft or use project-scoped copy).
4. Publish global template; set Active.
5. Use Published template on new project creation.
Playbook 2: Pilot on one project, then promote
1. Create project with System or Published Custom source.
2. Save project; open project-scoped Draft template from Edit Project.
3. Customize; validate with project team.
4. Promote to Global with a descriptive name.
5. Publish global copy when ready for wider use.
Playbook 3: Retire a template
1. Set template Inactive to remove from project creation dropdown.
2. Delete only if Draft and no linked projects.
3. Keep Published templates linked to projects as Inactive for historical reference.
Playbook 4: Change template on a Draft project
1. Confirm project execution status is Draft.
2. Edit project or use Change Project Template from Manage Projects.
3. Select new System or Published Custom source; save.
Playbook 5: Recover when layout locked appears
1. Identify which module has live data causing data lock.
2. For structural greenfield needs, clone template or Promote to Global to a new Draft.
3. Do not delete live project data to force unlock; adjust only safe metadata where permitted.
C.5 Pre-Publish Checklist
Target audience: Template owners before setting status to Published.
- Module mix validated (dependencies satisfied, plan entitlements OK).
- Backlog requirement_form set correctly (RTM vs User Story) if Backlog is active.
- Custom fields within plan limit; labels and placeholders reviewed.
- Status options reviewed; no duplicate labels.
- Special fields and Dashboard conditions set for intended widgets/tabs.
- Pilot tested on at least one project where possible.
- Template name finalized (cannot change after publish).
- Stakeholders informed that Published global templates remain structurally editable but names lock.
Appendix D: Limits, Locks, and Troubleshooting
D.1 Plan Limits Glossary
Target audience: Tenant administrators and procurement stakeholders managing subscription entitlements.
- no_of_custom_templates – Maximum number of custom templates the tenant can create. When exceeded, Add is blocked with contact-sales messaging.
- no_of_custom_fields_for_template – Maximum custom fields across active custom templates in Custom Layout sections only.
- Module entitlements – Controls which modules appear in the template editor (e.g. DocuGen, Service Requests, Traceability).
- Plan downgrade – Excess custom templates beyond new limit may become read-only until within quota.
D.2 Data Lock Reference
Target audience: Template owners, project managers, and support staff when layout edits are unexpectedly blocked.
Data lock (is_data_locked) applies when linked projects contain live records or stored custom field values in sensitive modules.
- Modules subject to data lock: Defects, Backlog, Action Items, Phases, Phase Requirements, Service Requests.
- Blocks: linkage changes, section/field edits that would break stored values, some special field changes.
- Backlog requirement_form locks when backlog data exists in linked projects.
- Service Request status changes blocked if status value is in use on live records.
- Sections/fields with stored values: only safe metadata edits (section name, display order, fields per row) may be allowed.
D.3 Error and Message Glossary
Target audience: All users encountering template UI messages; support and administrators resolving issues.
- You don’t have permission to view this screen – Missing project-template-view; update Role Privileges.
- Once published, the template name cannot be changed – Expected; clone to new Draft if rename needed.
- This template is Published – editing is disabled – Project-scoped Published template; edit while Draft or Promote to Global.
- Published template cannot be deleted – Set Inactive instead; unlink projects first if reverting Draft is required.
- Customisation is not allowed for this module – Module on Fields tab block list (Appendix A.6).
- Maximum custom fields/custom templates on your plan – Plan limit; upgrade or remove unused fields/templates.
- Module activation blocked – Enable parent modules per Appendix A.5.
- Template is Published – module activation cannot be changed – Project-scoped Published lock.
- Layout locked / data lock messaging – Live project data exists (Appendix D.2).
- Are you sure you want to mark this template as Published? – Confirmation before name lock.
D.4 Validation Rules Summary
Target audience: Template owners and administrators preventing save failures.
- Template name: required; unique per tenant for global templates (case-insensitive check).
- Clone From: required when creating custom template.
- Section name: required; max 60 characters; unique per module linkage.
- Field label: max 60 characters; unique per module linkage on create.
- Status label: letters and spaces only; min 3, max 60; unique within module/template.
- Cannot combine system_template_id with cloned_from_template_id on create.
- Cannot pass modules/special_fields payload with system_template_id on create.
- Dropdown option values: unique per field.
Appendix E: Roles, Projects, and Terminology
E.1 Sample Role Configurations (Illustrative)
Target audience: Tenant administrators designing Role Privileges. Examples only – your tenant may differ.
Tenant Administrator (illustrative)
settings-project-template: Read and Edit | project-template-view/add/update/delete: Read and Edit
Template Owner / Application Admin (illustrative)
Full template CRUD in Settings; can publish and manage Active flag.
Project Manager (illustrative)
project-template-view: Read or Read and Edit; project-template-update: Read for view-only template inspection.
May edit project-scoped Draft copies if update privilege granted; Promote to Global if permitted.
Author / Tester / Client User (illustrative)
Typically no Settings access; experiences template through project tabs and record forms only.
project-template-view: Hidden or Read if template visibility needed for reference.
E.2 Project-Template Relationship
Target audience: Project managers and administrators linking projects to templates.
- On project create/update with template selection, platform creates project-scoped Draft template linked via testing_project.
- Project stores module_configuration_template FK and template_source (system or custom).
- Template source and dropdown selection editable only when project execution status is Draft.
- Change Project Template (Manage Projects) available per role and project state.
- Deleting a project removes linked project-scoped templates (including Published copies).
- Lazy resolution: if project references template but no row exists, platform may auto-create on read.
E.3 Glossary and Term Mapping
Target audience: All users; especially new administrators learning BriefSpec terminology.
- Project Templates (UI) = Module Configuration Template (platform term).
- System Template = Camptra-wide blueprint; not tenant-owned.
- Custom Template = Tenant-owned ModuleConfigurationTemplate record.
- Global template = testing_project is null; listed in Settings Custom tab.
- Project-scoped template = testing_project set; name prefixed with project ID.
- Draft / Published = template status (workflow), not the same as project execution status.
- Active / Inactive (is_active) = whether template appears for new project assignment.
- Custom Layout = editable section for tenant-defined fields.
- Special field = module-level toggle (Boolean or Single select), not a per-record field.
- Data lock = layout protection when live module data exists in linked projects.
E.4 Modules Hidden from Template UI
Target audience: Administrators wondering why Projects module does not appear in the template editor.
- Projects module exists in the catalog but is_visible=false globally.
- It is not shown in the template editor module list but remains part of system linkages.
- Project creation and management are handled outside the template module toggle UI.
Appendix F: Advanced Reference
F.1 Platform-Only Capabilities (Not Available to Tenant Users)
Target audience: Tenant administrators setting expectations; BriefSpec platform operators.
- Create or delete SystemModuleConfigurationTemplate records via tenant UI.
- Edit system template module linkages, sections, or special field defaults via tenant UI.
- Rename system templates via tenant API (only description, status, is_active are tenant-updatable on system templates).
- CRUD on system module status options (CamptraSuperAdmin admin endpoints).
- Template module catalog admin CRUD (Super/Admin/AppAdmin only).
- Tenants interact with system templates only through read, clone, and project assignment.
F.2 Custom Fields on Live Records (Expanded)
Target audience: Business analysts, template owners, and project managers after go-live.
- Values entered in custom fields on Defects, Service Requests, Backlog items, Action Items, Phases, and other supported modules are stored as ModuleObjectFieldValue records linked to the template module linkage.
- Stored values trigger data lock rules on field definition changes.
- Reordering fields may be allowed; changing type or deleting fields with values is blocked.
- Custom fields on modules with Fields tab blocked (Appendix A.6) are not added via template UI for those modules.
- For greenfield structural changes after go-live, clone template or Promote to Global rather than modifying locked layouts in place.
F.3 Related Settings Cross-Reference
Target audience: Tenant administrators navigating adjacent configuration areas.
- Settings > Role Privileges – Assign project-template-* and settings-project-template levels (Appendix A.3, E.1).
- Settings > Manage Plan – View no_of_custom_templates and no_of_custom_fields_for_template quotas (Appendix D.1).
- Manage Projects > Create/Edit Project – Template selection and Promote to Global (Section 11, Appendix C).
- Manage Projects > Change Project Template – Reassign source when project is Draft.
- Software pillars (e.g. on Service Requests) are configured on projects/clients, not in the template editor.