Your BriefSpec plan determines how many clients, users, projects, and AI tokens you can work with — and what features are available. This guide walks you through the Manage Plan page, where you can see your current subscription, check how much of each allowance you’ve used, compare what every tier offers, and buy add-ons when you need more room. It’s the single place where your commercial relationship with BriefSpec lives, and understanding it prevents the two most common surprises in a growing implementation practice: hitting a hard limit mid-cycle and paying for capacity you aren’t using.
Prerequisites
Before you can manage a plan, three things must already be in place:
- An active tenant. A tenant (your BriefSpec workspace) is created when your organization signs up. If you’re on a trial or paid plan, that tenant carries a subscription record.
- The right privilege. You must hold the Manage Subscription Plan privilege, which is granted to Application Admins by default. If you can see Settings → Manage Plan but the action buttons are disabled, your role lacks this privilege — ask an Application Admin to grant it.
- A linked Stripe account. Payments flow through Stripe. If your plan was provisioned by the BriefSpec team (rather than purchased through self-serve checkout), you may see a note that the plan was “assigned outside Stripe” — this is normal and simply means changes route through Sales rather than instant checkout.
Where Plan Management Fits
BriefSpec is multi-tenant: each client engagement gets its own isolated workspace, but your plan is a single subscription that governs the whole tenant. The Manage Plan page is part of Settings (not a project), because plan limits — seats, storage, AI tokens, custom roles — apply across all of your projects at once.
This is different from project-level configuration. When you set up a project’s phases, boards, or templates, you’re shaping one engagement. When you change your plan, you’re changing the ceiling that all of your engagements share. Concretely: buying 5 extra internal seats adds capacity everywhere, instantly; editing a single project’s backlog does not.
Reading Your Current Plan
The top card on the Manage Plan page summarizes your subscription at a glance:
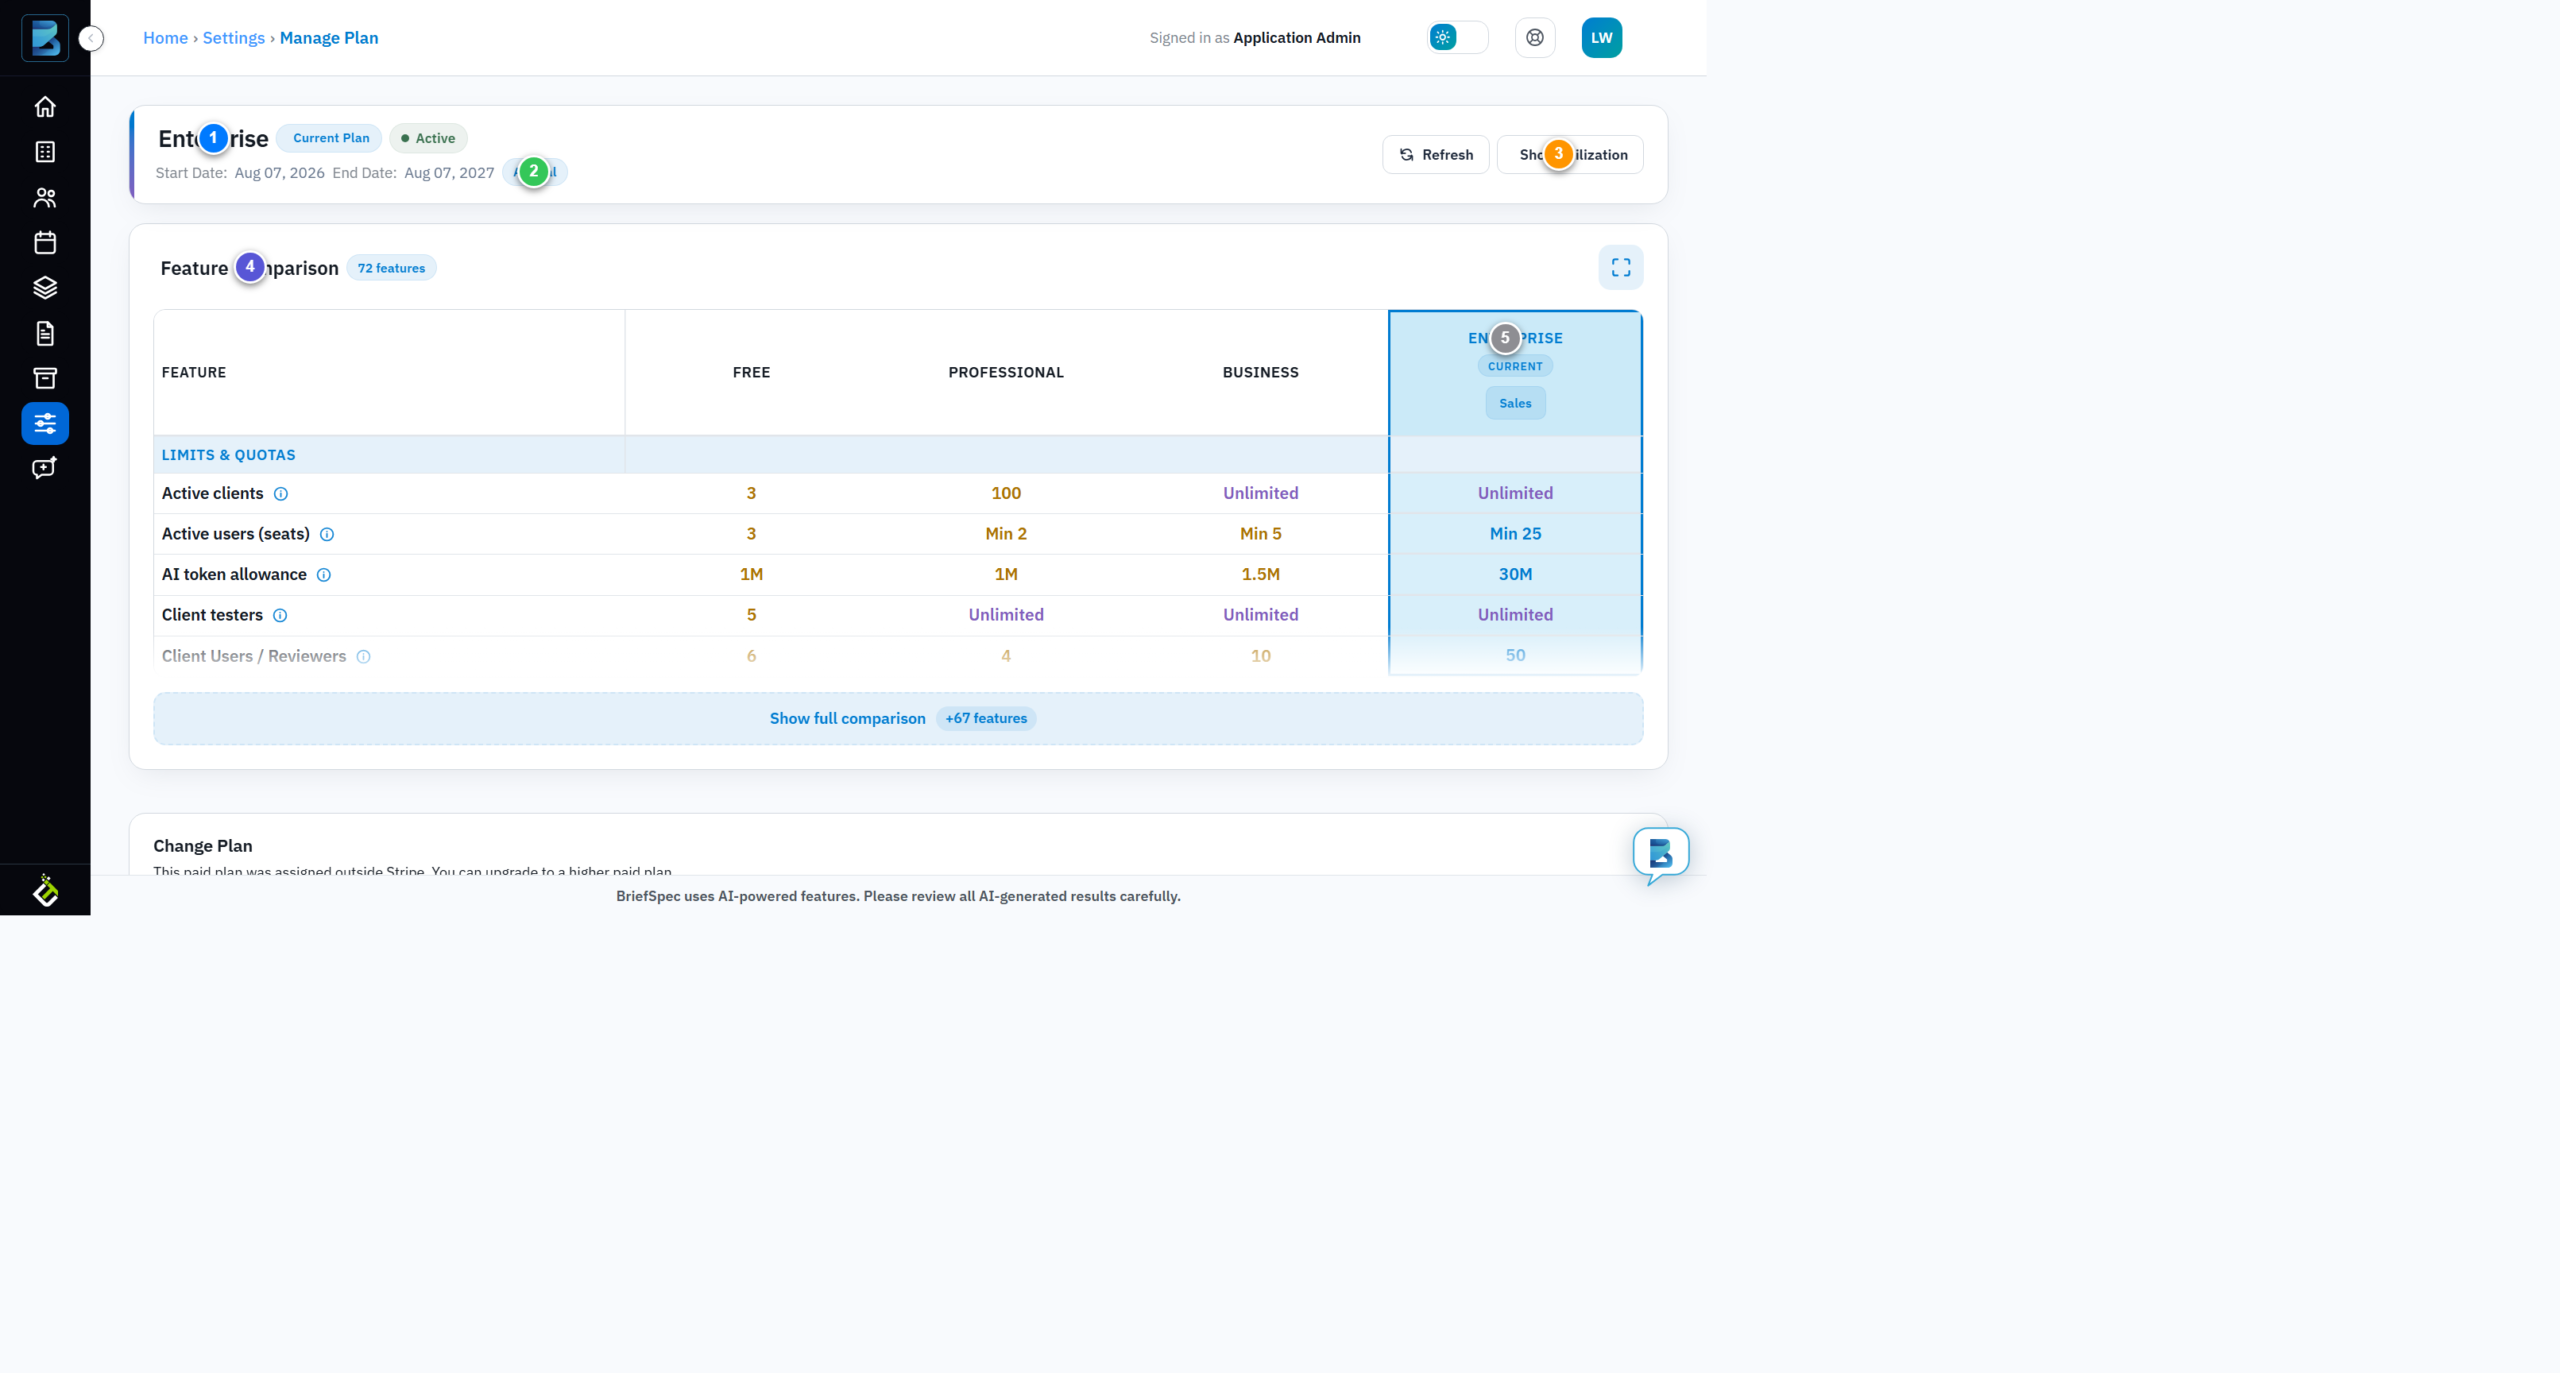
- Current plan (1) — the tier you’re subscribed to (Free, Professional, Business, or Enterprise). This is the source of truth for what you’re entitled to.
- Status and billing (2) — whether the plan is Active, the billing cadence (Annual vs. Monthly), and the start/end dates. Annual plans bill once per term; monthly plans renew every month.
- Refresh and Show Utilization (3) — Refresh re-syncs the page with Stripe (useful right after a payment or a plan change). Show Utilization reveals your live consumption, covered next.
- Feature comparison (4) — the full matrix of what each tier includes, described in its own section below.
- Plan tiers (5) — the four columns (Free, Professional, Business, Enterprise). Your active tier is highlighted.
Why the dates matter: if your end date has passed or is close, the plan may auto-renew, downgrade, or expire depending on your billing settings. Keep an eye on this before a client goes live — a lapsed plan mid-UAT is exactly the kind of surprise that stalls a delivery.
Viewing Plan Utilization
Click Show Utilization to see how much of each allowance you’ve actually consumed. This is the page’s most important habit: checking utilization before you hit a ceiling, not after.
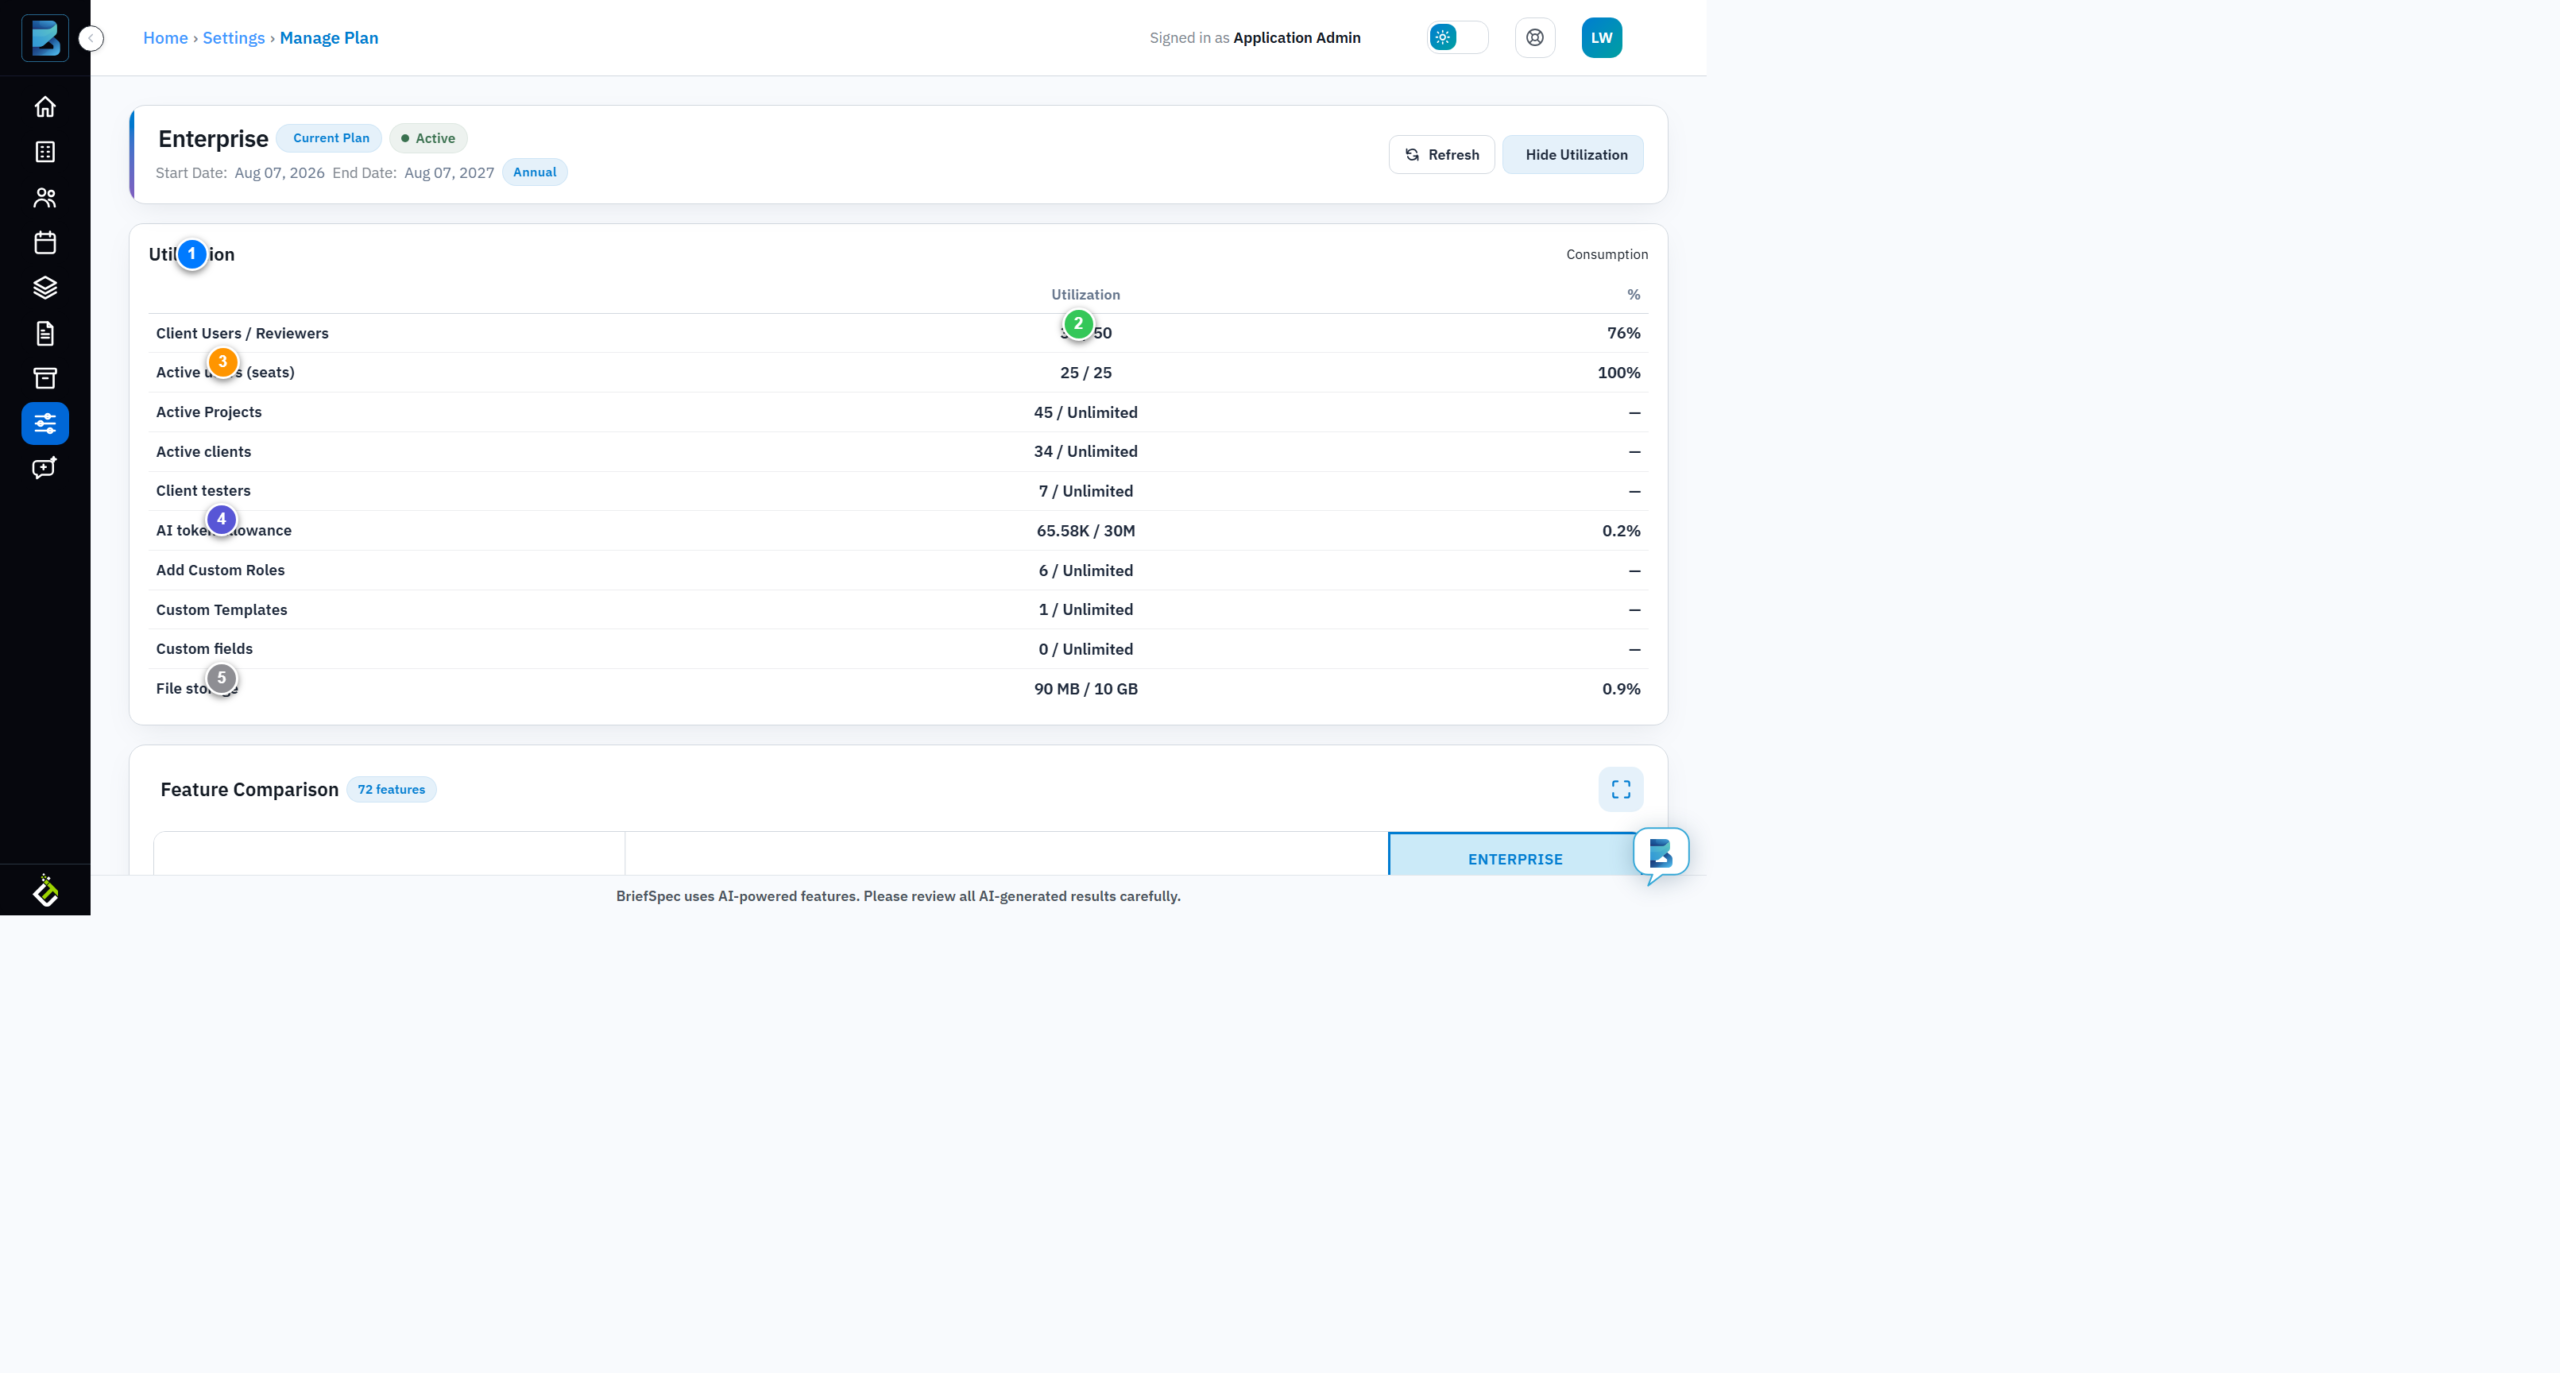
- Utilization header (1) — marks the consumption section, revealed only when Show Utilization is toggled on.
- Consumption value (2) — each row shows used / limit (e.g. “38 / 50”). The first number is live usage; the second is your plan’s ceiling.
- Seats at 100% (3) — “25 / 25” means every internal seat is taken. This is the classic trigger for buying an add-on: you can’t invite another consultant until you free or buy a seat.
- AI token allowance (4) — AI features consume tokens; here “65.58K / 30M” means you’ve used a fraction of one percent of a generous allowance.
- File storage (5) — “90 MB / 10 GB” is your document/attachment budget. Attachments, SOW files, and generated documents all count against it.
Reading the percentage column: values like 76% and 100% flag how close you are to a limit. Rows showing a dash (—) have no fixed cap (e.g. “Unlimited” projects). The discipline is simple: review utilization when you start a new phase — if seats or storage are above ~80%, plan the add-on purchase before it blocks your team.
Understanding the Feature Comparison
The comparison matrix shows all 72 features across the four tiers. It’s grouped into sections — Limits & Quotas, Project Templates, Modules, and more — so you can see not just what you get, but how much of it.
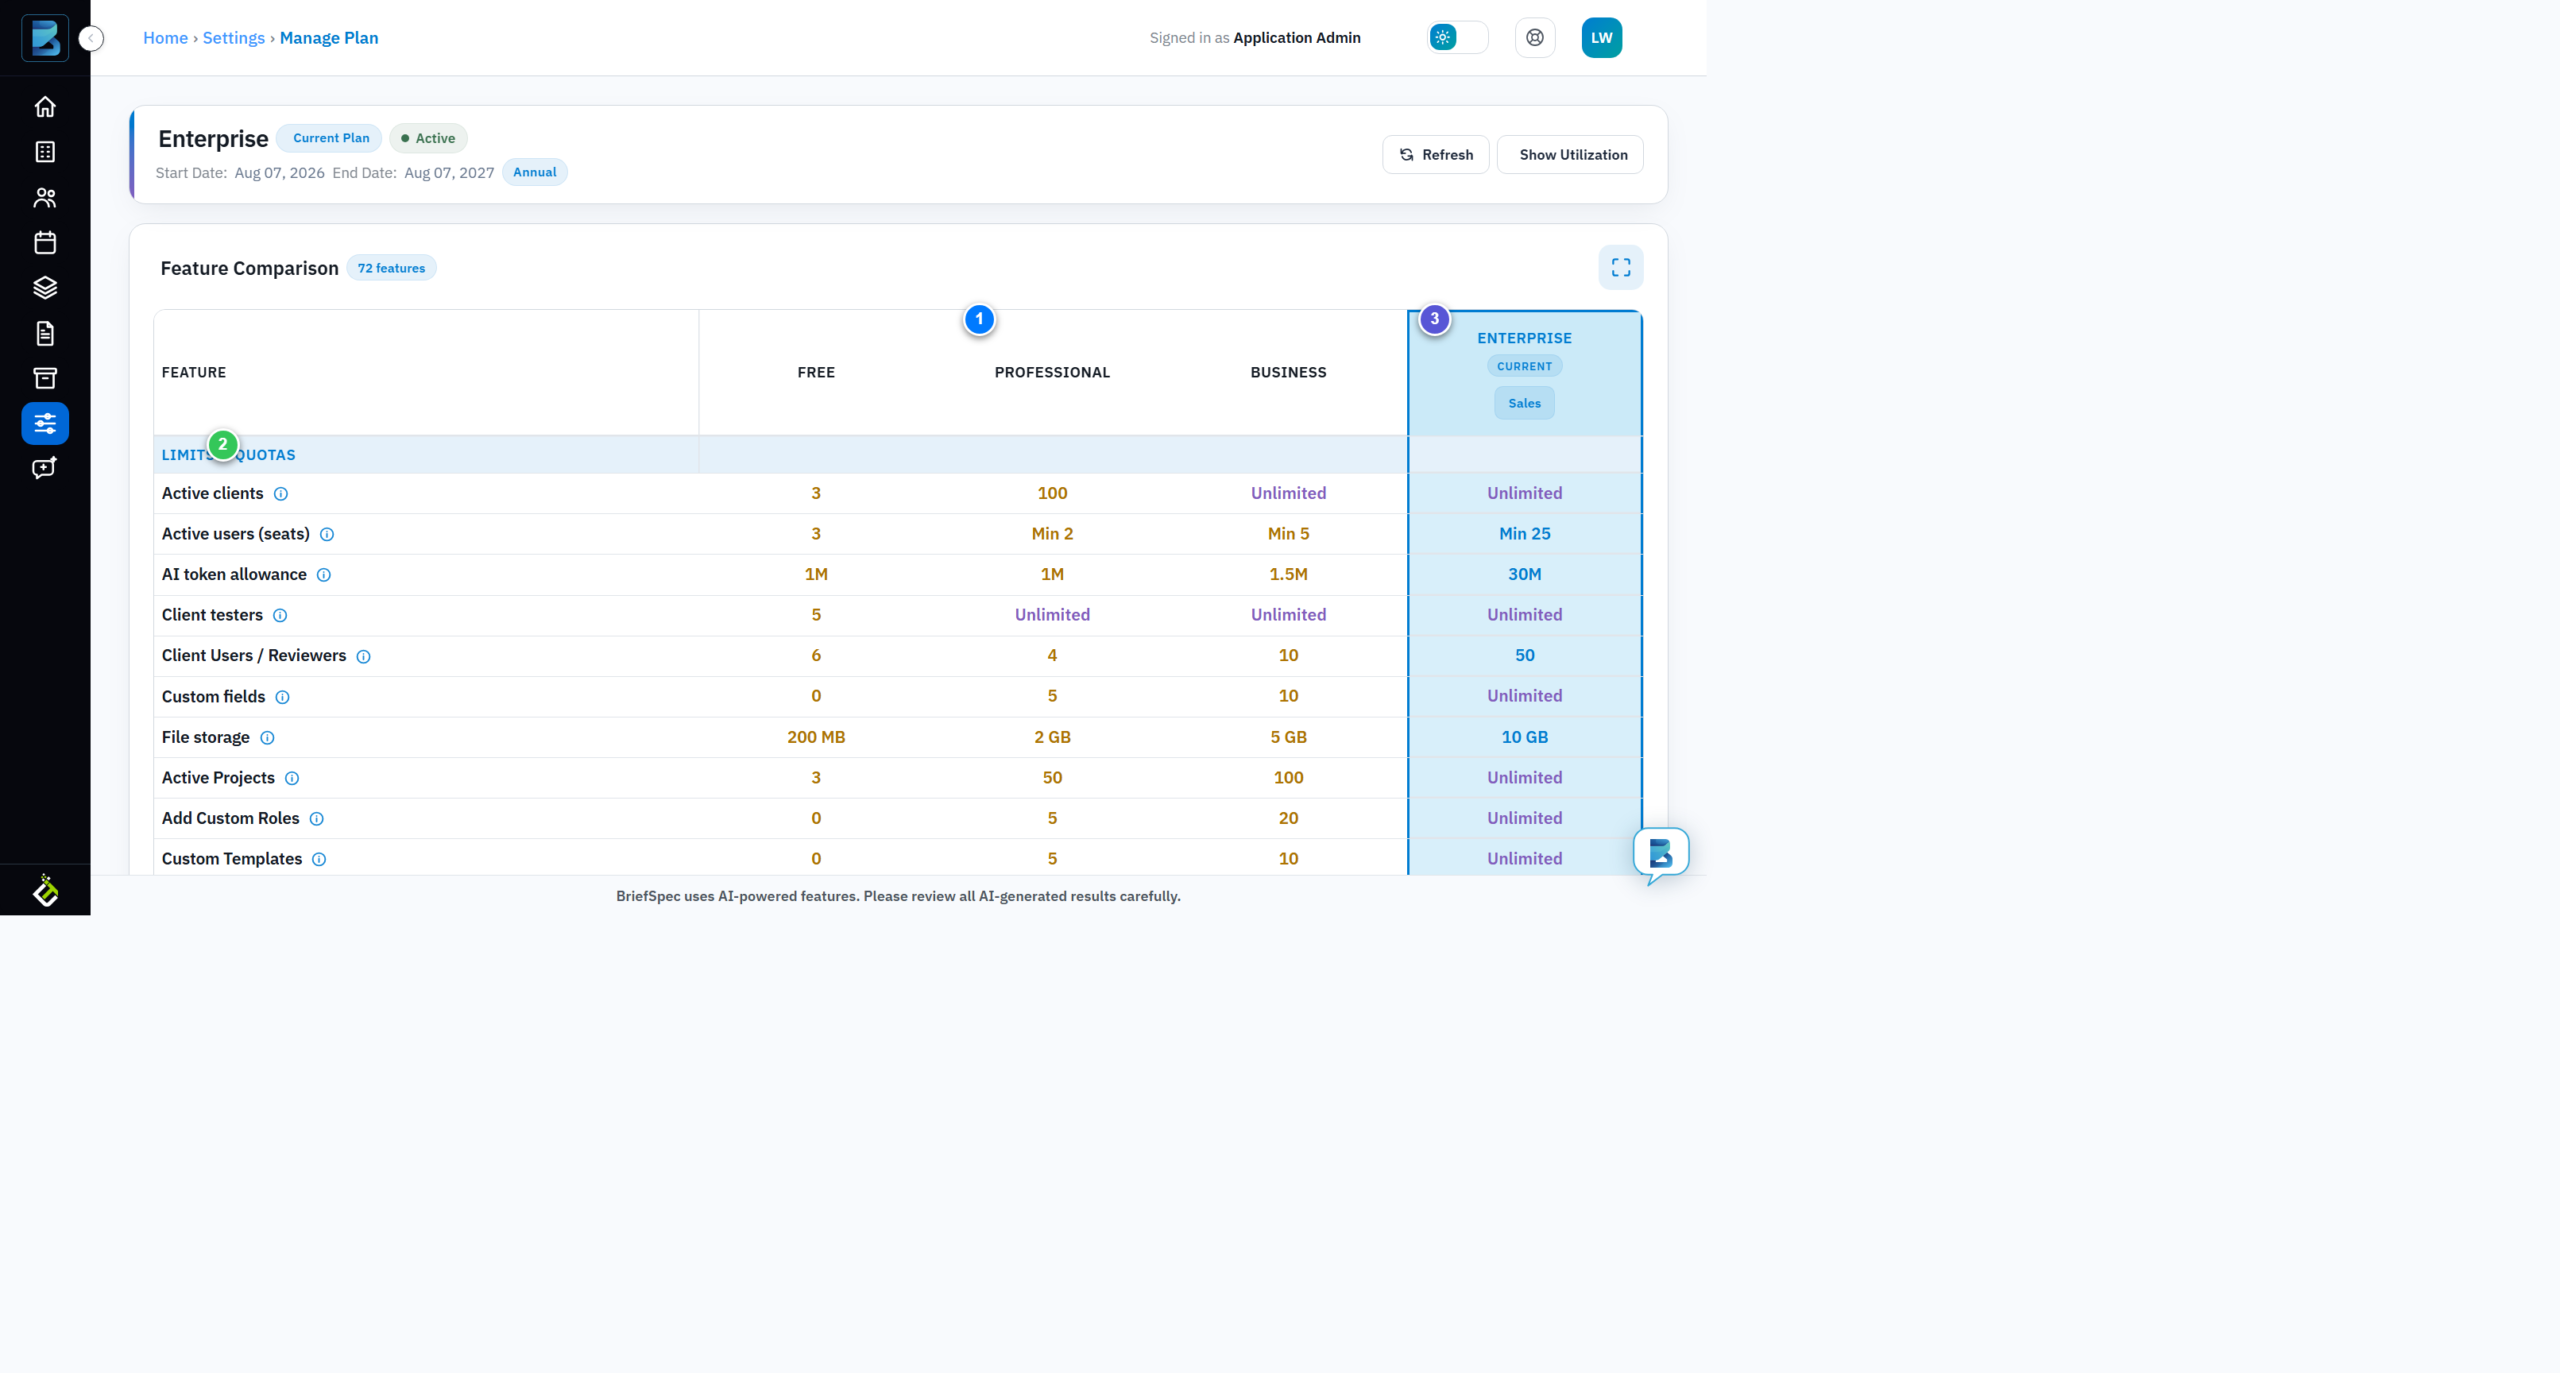
- Plan tiers (1) — Free, Professional, Business, and Enterprise, each a column. Values are either counts (“3”, “100”, “Unlimited”), minimums (“Min 2”), or Yes/No capability flags.
- Section groupings (2) — features are organized under headers like Limits & Quotas (how many clients, seats, tokens, storage) and Modules (which feature areas are enabled). This grouping matters because a “Yes” in Modules means the feature is present, while a number in Limits & Quotas means it’s capped.
- Current plan highlight (3) — your active tier’s column is visually marked, so you can read down it to confirm exactly what you’re entitled to.
Why this table is authoritative: it’s generated from the same plan definitions that enforce your limits. If a feature shows “No” for your tier, it isn’t just hidden from the UI — the backend will reject it. When a client asks “can we do X?”, this table is the definitive answer, faster than trial-and-error.
Adding Add-ons
Below the comparison, the Change Plan and Add-ons sections handle growth. Add-ons are how you expand capacity without changing your base tier.
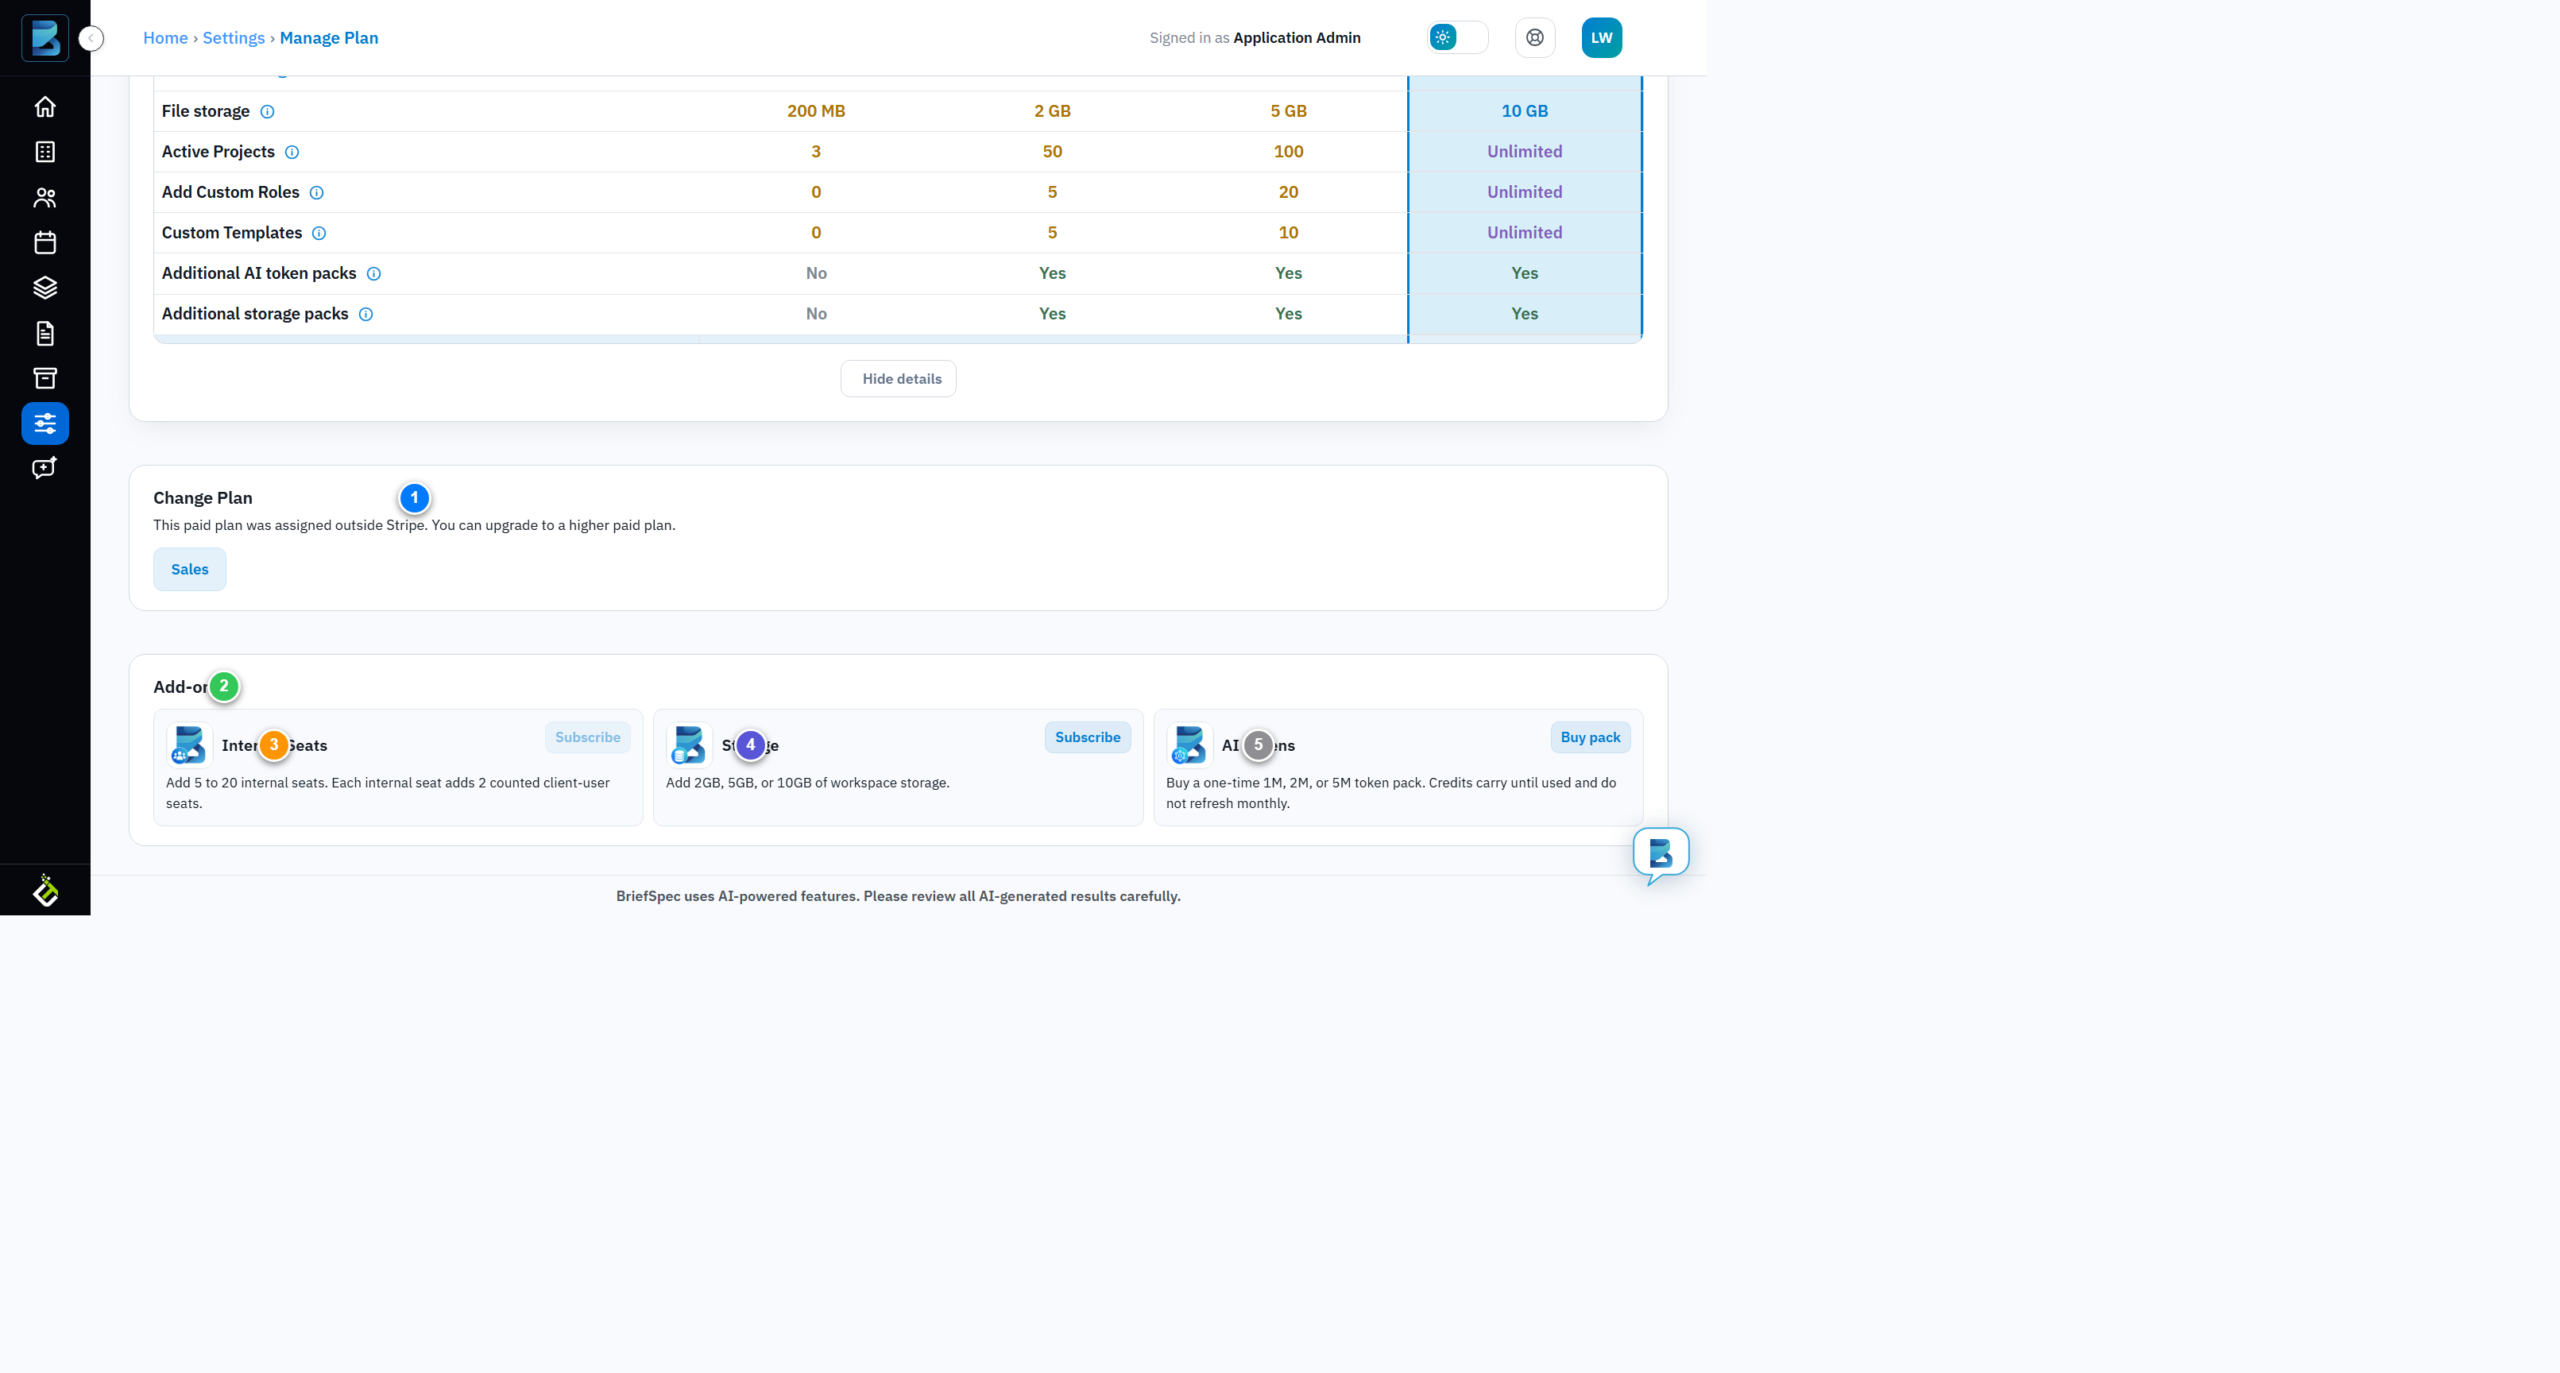
- Change Plan (1) — if your plan was assigned outside Stripe, you’ll see a note and a Sales button instead of self-serve options. Contact Sales to move between paid tiers.
- Add-ons (2) — the section header for the three expansion cards below.
- Internal Seats (3) — add 5–20 internal seats on a recurring subscription. Note the economics: each internal seat also adds 2 counted client-user seats, so buying internal capacity expands your client-facing headroom too.
- Storage (4) — add 2GB, 5GB, or 10GB of workspace storage, billed recurring. Choose this when file-storage utilization (from the Utilization panel) is climbing.
- AI Tokens (5) — a one-time token pack (not recurring). Tokens are consumed by AI features and carry forward until used — they don’t reset monthly, so a pack is a durable balance, not a subscription.
Recurring vs. one-time: seats and storage are subscriptions (they renew each cycle); AI token packs are single purchases. This is why the buttons differ — “Subscribe” for recurring, “Buy pack” for one-time.
Purchasing an AI token pack
Clicking Buy pack opens a focused purchase dialog:
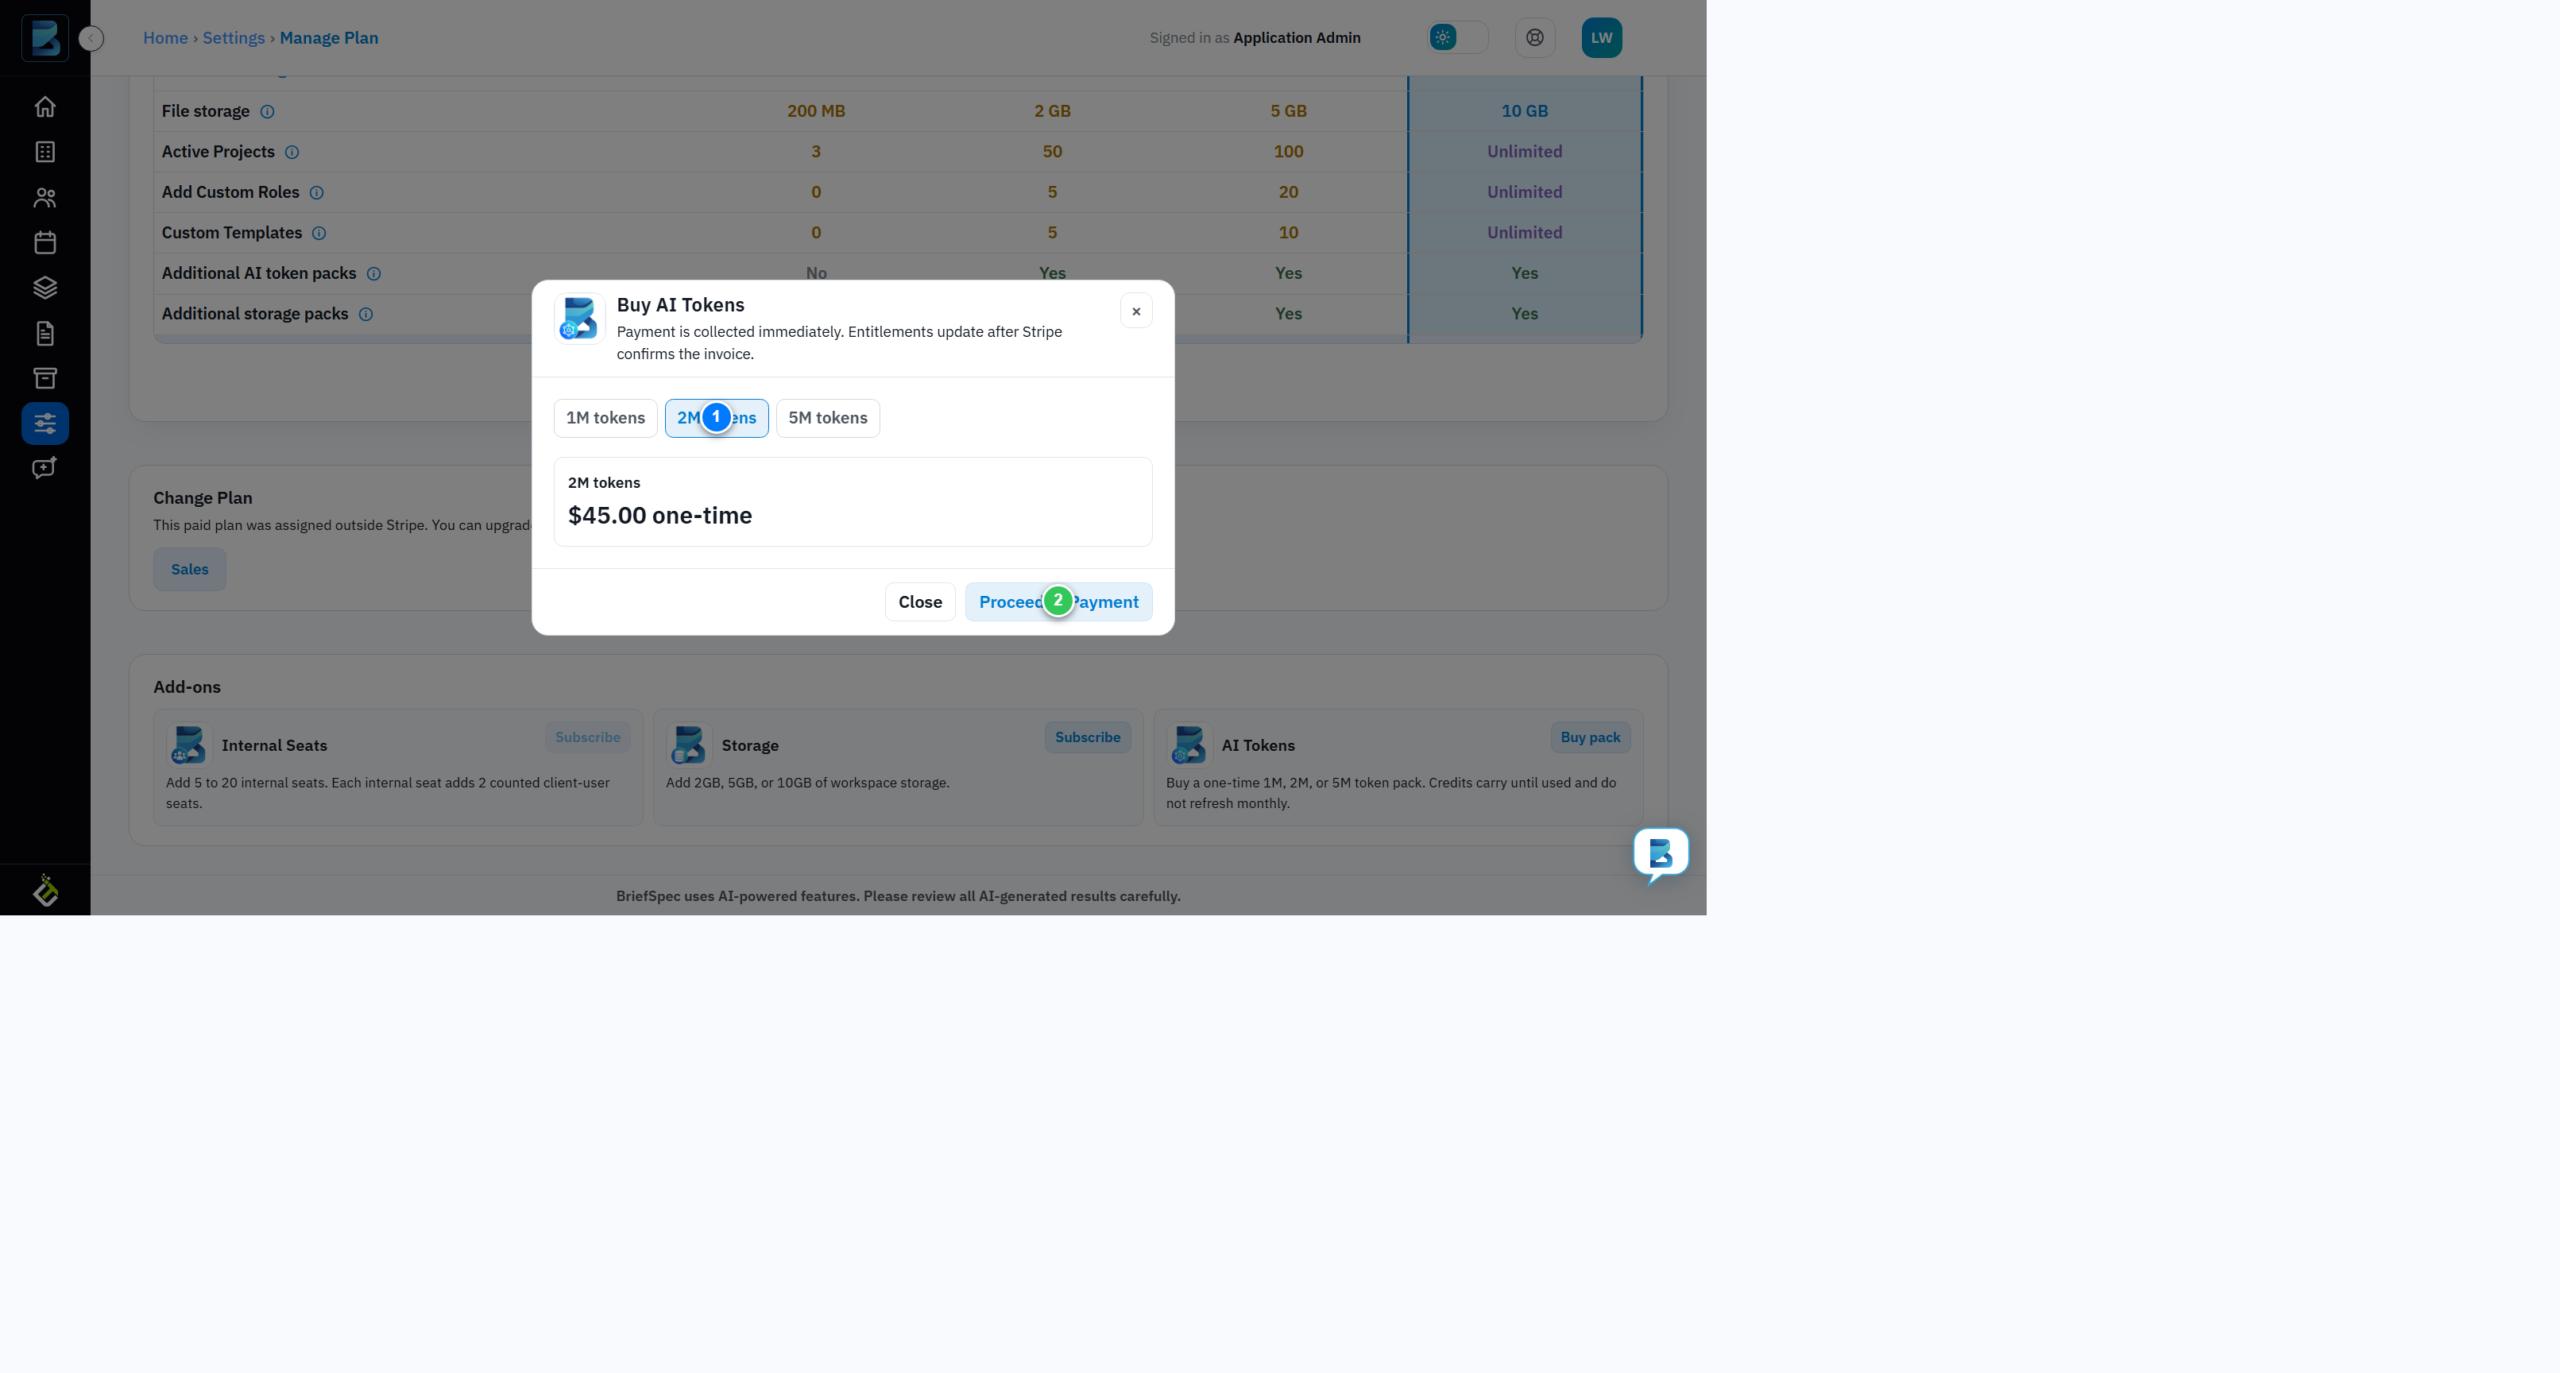
- Pack size (1) — choose 1M, 2M, or 5M tokens. The price updates to match the selected size (e.g. 2M tokens for a fixed one-time price).
- Proceed to Payment (2) — moves you to the Stripe checkout. Payment is collected immediately, and your entitlement updates once Stripe confirms the invoice.
After purchase, return to Show Utilization to confirm the new token balance has landed — this is the quickest way to verify the add-on took effect.
Changing Your Plan
There are two paths for changing your base tier:
- Self-serve checkout — if your plan was purchased through BriefSpec’s checkout, you’ll see Subscribe buttons on the higher tiers. Selecting one routes you through Stripe checkout and activates the new plan on confirmation.
- Sales-assisted — if your plan was “assigned outside Stripe” (common for Enterprise and negotiated deals), the Sales button is your path. This is intentional: negotiated pricing, custom seat counts, and enterprise contracts need a human to set up correctly.
A note on downgrades: moving to a lower tier isn’t always self-serve. If you’re over the lower tier’s limits (e.g. 38 active users when the target tier allows 10), the system will prevent an immediate downgrade rather than silently cutting off access. In those cases, contact Sales or Support to plan the transition.
What’s Next
- View your account and profile settings to manage your name, email, and branding.
- Understand roles and privileges to control who can access the Manage Plan page.
- Create your first project to put your plan’s capacity to work.