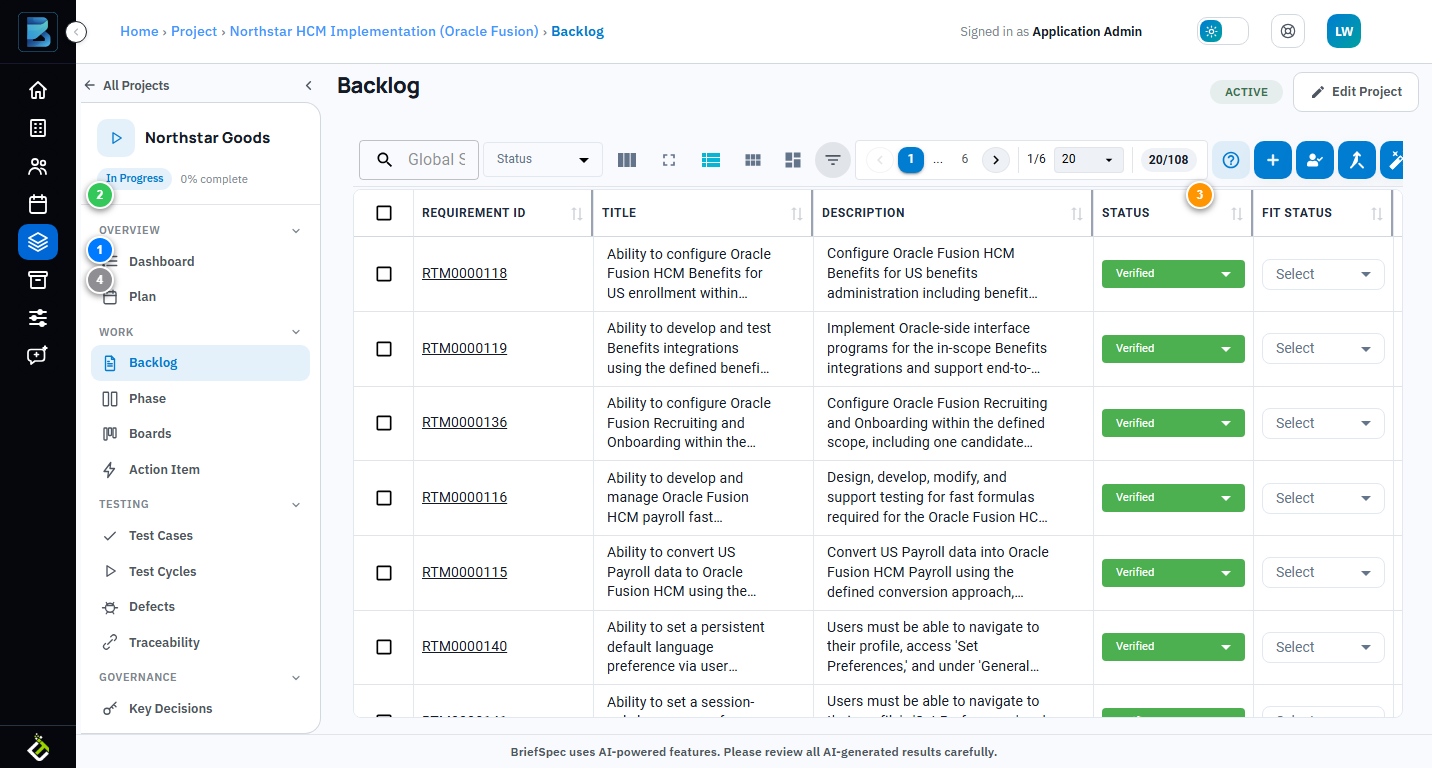
The Backlog is where you manage everything that needs to be built. Every requirement — whether entered manually, imported from Excel, or generated from an SOW — lives here in a structured table that feeds directly into your test cases and traceability matrix.

BriefSpec Backlog showing requirements table with columns and filters
The Backlog table. Each row is a requirement with its ID, title, status, and key attributes. Use the toolbar above the table to search, filter, and switch views.

Backlog Table Columns

The table gives you a comprehensive view of every requirement:

  • Requirement ID — A unique identifier (e.g., RTM0000118). Click it to open the full requirement detail page.
  • Title — The requirement’s name or summary.
  • Description — Detailed text explaining what needs to be built or verified.
  • Status — Where the requirement is in its lifecycle: Draft, Build, Verified, Pending Review, Delivered, Archived, or On Hold.
  • Fit Status — Gap analysis result: Fit, Gap, or Partial. Helps identify where custom work is needed versus standard functionality.
  • Solution Type — How the requirement will be addressed: Configuration, Customization, Integration, etc.
  • Hierarchy — The requirement’s position in the parent-child structure (Epic → Feature → Story).
  • Pillar — The functional area this requirement belongs to (e.g., Oracle Cloud HCM, Finance).

Toolbar Controls

Above the table, the toolbar gives you everything you need to manage the view:

  • Global Search — Search across all columns by keyword or ID.
  • Status filter — Filter by requirement status to focus on what’s relevant right now.
  • Columns — Show or hide specific columns to customize your view.
  • Full Screen — Expand the table to fill your entire screen for focused work.
  • List / Grid / Kanban views — Switch between a traditional table, card grid, or Kanban board layout.
  • Advanced Filters — Open detailed multi-criteria filtering.
  • Pagination — Navigate through pages and adjust how many rows appear (20, 50, or 100 at a time).

Adding Requirements

Click the Add Requirements button to create new entries. You can add requirements one at a time manually, bulk-import from an Excel spreadsheet, or use the AI-powered SOW ingestion to generate requirements automatically from a statement of work document.

Inline Editing

Many columns support inline editing — click directly into a cell to change its value without opening the full detail page. This is especially useful for updating status, fit status, or solution type across multiple requirements quickly.

Selecting & Bulk Actions

Use the checkboxes on the left to select multiple requirements, then apply bulk actions like status changes, assignments, or exports. The select-all checkbox in the header selects every requirement on the current page.