Settings Guide
Application Administrator Guide
BriefSpec
1. Introduction
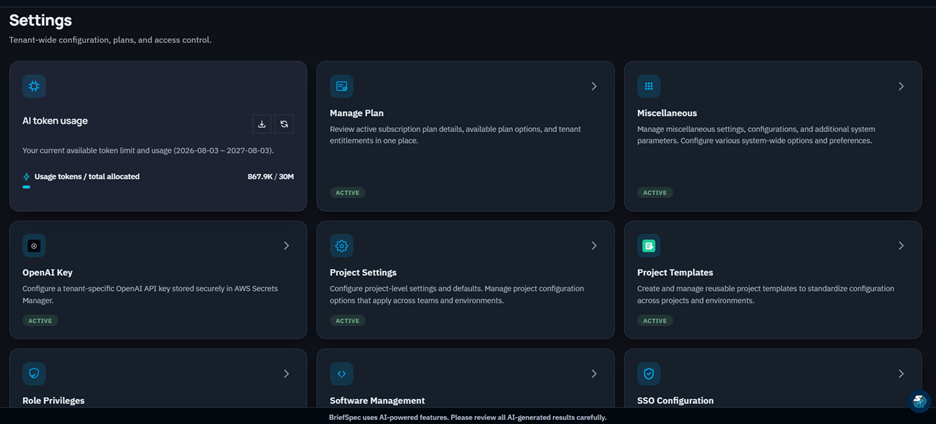
The Settings area in BriefSpec is the central configuration hub for Application Administrators. It provides access to tenant-wide configuration including software hierarchy, role permissions, project templates, subscription plan management, AI integration, and a range of lookup data that drives record forms and project workflows across the platform.
This guide covers every card available on the Settings landing page. It explains what each setting area controls, who should manage it, and how changes made here affect the broader BriefSpec tenant experience. Settings cards visible to a user depend on their role privileges; not every administrator sees every card.
Navigation path: Sidebar > Settings > Settings landing page.
2. Accessing Settings
Navigation
- Click the Settings icon in the left sidebar to open the Settings landing page.
- The landing page displays all configuration cards available to your role.
- Breadcrumb trail: Home > Settings.
- Cards are sorted alphabetically. Click any card to navigate to that settings area.
Card visibility and plan gating
- Each card is controlled by a corresponding privilege key in Role Privileges. If a key is set to Hidden, the card does not appear for that role.
- Some cards are additionally gated by the tenant subscription plan. If the plan does not include a feature, the card appears disabled (boxed in red border) with a tooltip explaining the restriction.
- Cards that are loading access data show a pulsing overlay until role and plan data is confirmed.
AI Token Usage summary
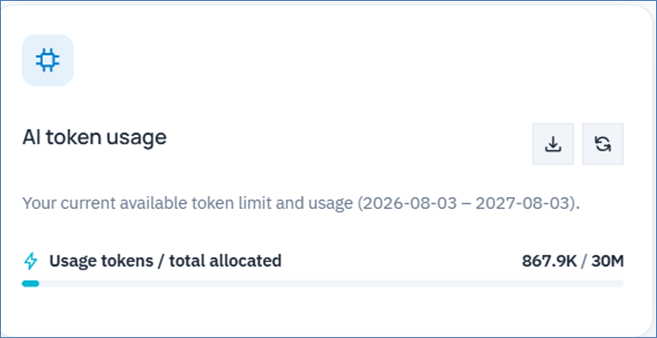
When the Role Privileges privilege is visible, the Settings landing page also displays an AI Token Usage card at the top of the grid. This card shows the current AI token consumption versus the total allocated for the tenant, along with a Refresh button to reload the latest figures.
3. Software Management
Software Management is the master catalog for all software platforms (also called Pillars) and their Modules/Epics. This catalog drives the scope selection on projects, the pillar and epic filtering in Backlog, Defects, Service Requests, and Test Cases, and the AI-assisted hierarchy generation features.
Navigation: Settings > Software Management.
Main Software (Platforms)
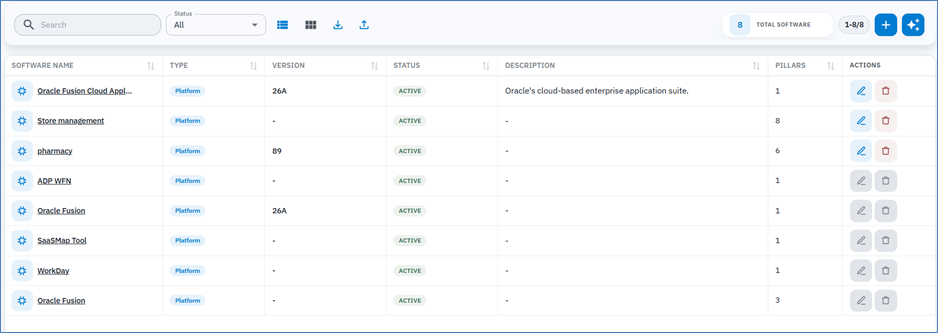
The top level of the catalog is a list of software platforms. Each platform entry has:
- Software Name – the display name used across all project modules.
- Software Type – classification of the platform: Platform, Framework, Library, DevOps Tool, Development Tool, or Other.
- Version – optional version identifier for the software release.
- Status – Active or Inactive. Only Active platforms appear in project scope dropdowns.
- Description – optional free-text description of the platform.
Pillars and Modules/Epics
Inside each software platform, Pillars and Modules/Epics define the hierarchical breakdown:
- Pillar – a high-level functional domain within the software (for example Oracle HCM > Payroll).
- Module/Epic – a functional area within a pillar (for example Payroll > Time and Attendance).
- Both pillars and modules carry Active/Inactive status. Inactive entries are hidden from project scope and record forms.
Views and tools
- List View and Grid View – toggle between table and card-based display.
- Search and Columns filter – narrow the visible software list.
- Export Software Hierarchy – download the full catalog as an Excel file for review or offline editing.
- Import Software Hierarchy – upload an Excel file to bulk-create or update the catalog. An import summary dialog reports created and skipped records after processing.
- Generate Pillars and Epics with AI – AI-assisted generation of the software hierarchy based on a natural-language prompt. Requires AI features to be enabled for the tenant.
- Add Software / Add Pillar – create individual entries manually.
Business Processes
Each software platform optionally includes Business Processes, which define the structured L1 (top-level) and L2 (sub-level) process taxonomy. Business processes are used by the AI-assisted user story and test script generation workflows to scope generation to a specific process area.
- L1 Business Processes – top-level process categories (for example Hire to Retire, Order to Cash).
- L2 Business Processes – sub-processes within an L1 process.
- Status (Active/Inactive) and Description are configurable for each process entry.
- Business Processes appear in the project-level Business Process configuration and in the transcript-based generation flow.
Access control
- Privilege key: settings-software-management.
- Hidden = card not shown. Read = view only. Read and Edit = full CRUD.
- Below is an image of Software(s) configured for a Tenant
4. Testcase Library
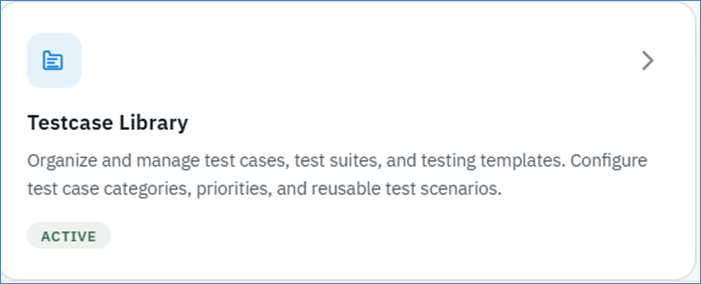
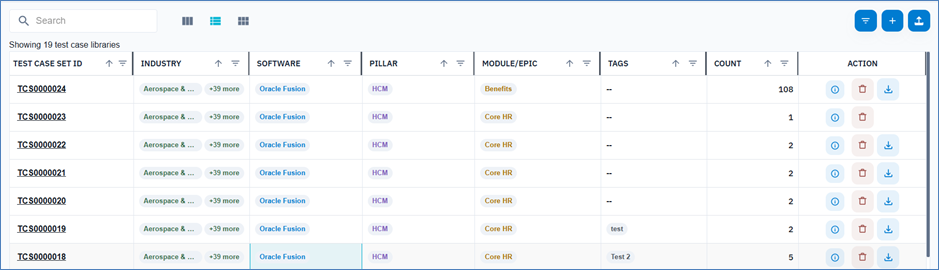
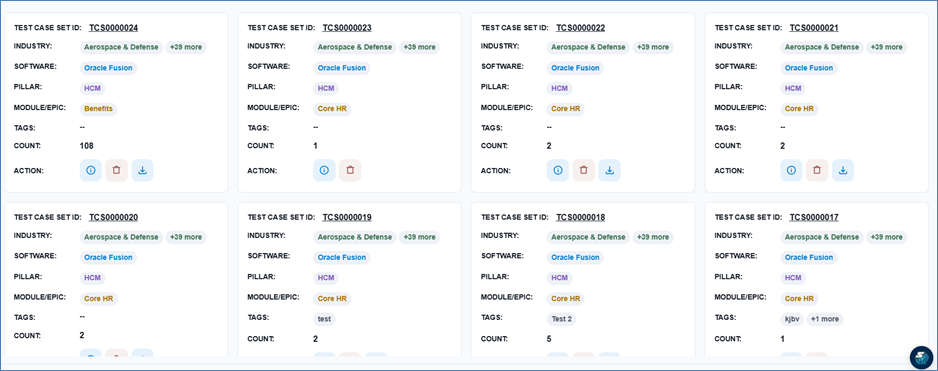
The Testcase Library is a tenant-wide catalog of reusable, industry-standard test cases that can be imported into projects. It is a plan-gated feature; the Testcase Library card is visible only when the test_case_library_module entitlement is active on the tenant plan.
Navigation: Settings > Testcase Library.
What the library contains
- Pre-built test cases organized by industry and functional area.
- Each library test case has a Test Case ID, Industry tag, Title, and Source File reference.
- Administrators can browse, search, and filter the library to find relevant test cases.
Views and search
- List View and Grid View toggle.
- Search by test case ID, title, or other attributes.
- Columns filter to adjust visible table columns.
- Expanded detail view opens a test case record to view full content including steps and expected results.
- List View
- Grid View
Importing from the library into a project
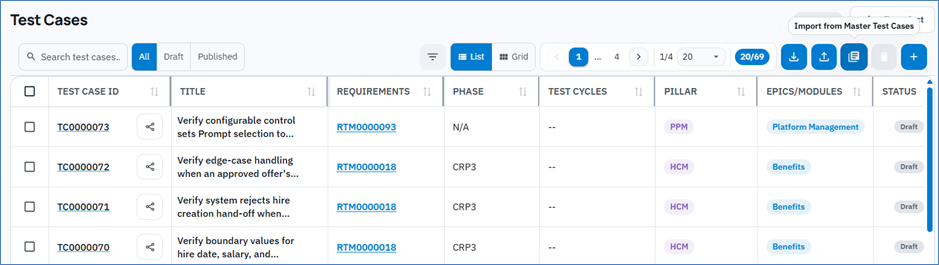
- Users with appropriate project permissions can select library test cases and import them into a project Test Cases module.
- Import analysis and processing dialogs confirm the records to be created before committing.
- Navigate to the ‘Test Cases’ tab in the Project and click on the ‘Import from Master Test Cases’ icon as shown below.
Access control
- Privilege key: settings-testcase-library.
- Plan entitlement: test_case_library_module must be active. When disabled, the card shows a plan upgrade prompt.
5. Project Templates
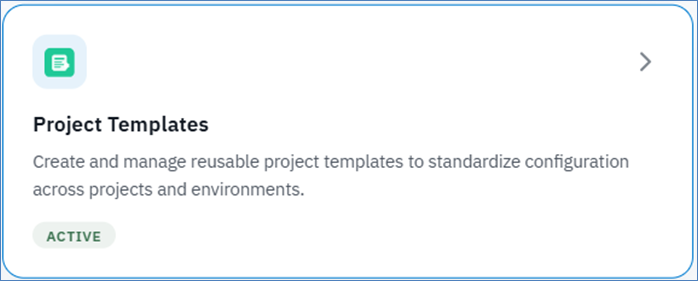
Project Templates (also referred to as Module Configuration Templates) define which modules are active in a project, how record forms are laid out, which workflow statuses are available, and which special feature toggles are enabled. Every project must be assigned a template at creation time.
Navigation: Settings > Project Templates.
Template types
- System Templates – read-only platform-provided blueprints: RTM – All Modules, US – All Modules, Managed Services, Testing, and Documentation. Tenant users can browse and clone these but cannot edit them.
- Custom Templates (global) – tenant-owned templates created by cloning a system or existing custom template. Fully editable when in Draft status. Published status locks the template name.
- Project-scoped templates – Draft copies created automatically when a project is saved with a template selection. Named with the pattern: {Project ID} – {Source Template Name}.
Key configuration areas within a template
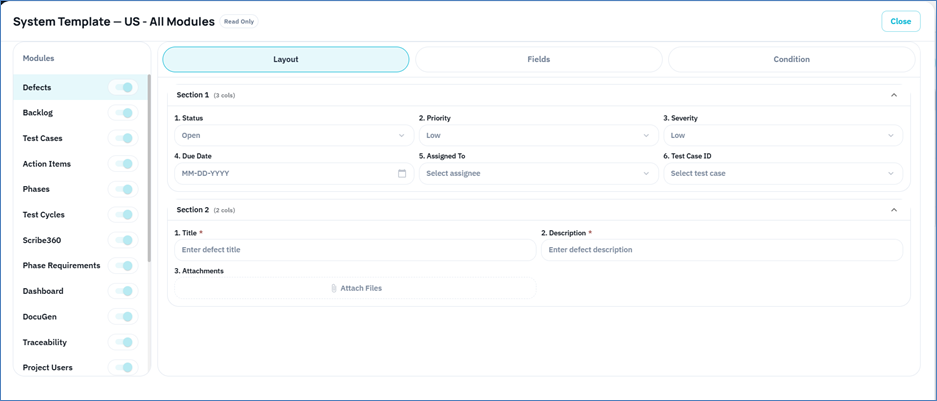
- Modules tab – toggle individual modules on or off (subject to dependency rules).
- Fields tab – view system fields (locked) and add custom fields in the Custom Layout section. Custom field types: Text, Text Area, Number, Currency, Date, Date Time, Dropdown, Multi-select, Checkbox, Email, URL, Phone.
- Status tab – manage workflow statuses for modules that support status (Defects, Backlog, Action Items, and others).
- Special Fields tab – configure module-level toggles such as mandatory defect creation, requirement form type (RTM vs User Story), mandatory requirement link for test cases, and mandatory attestation on test cycles.
Lifecycle
- Draft – full structural editing allowed.
- Published – name is locked; structural edits still allowed for global templates; project-scoped Published templates are fully locked.
- Active / Inactive – Active Published global templates appear in the project creation template dropdown.
- Promote to Global – converts a project-scoped template into a new global Draft custom template.
Access control
- Privilege key: settings-project-template.
- Sub-keys: project-template-view, project-template-add, project-template-update, project-template-delete.
For comprehensive documentation of the Project Templates feature, refer to the BriefSpec Project Templates Guide.
6. Project Settings
Project Settings provides tenant-wide configuration defaults that apply across projects. It is organized into module-specific tabs, each controlling default status, field, and behavior options for that module. It also includes the Project Type and Solution Type catalog management.
Navigation: Settings > Project Settings.
Project Type Management
The Project Type tab within Project Settings manages the catalog of project types available when creating a project. Project types classify the engagement category.
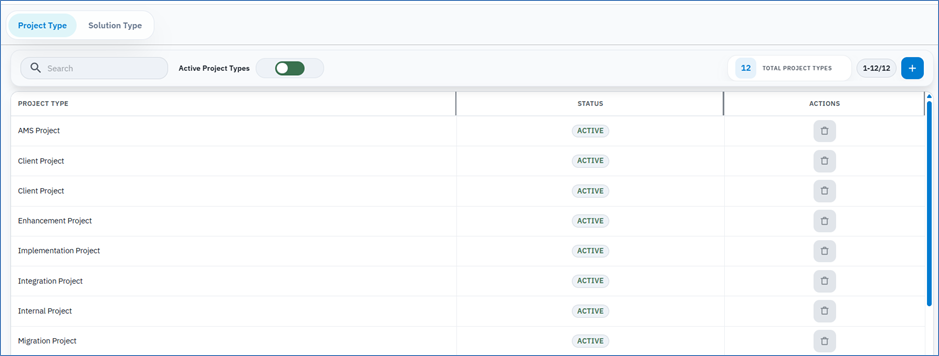
- Create, edit, and deactivate project types.
- System-provided types (for example Managed Services, Testing, Documentation) are always available.
- Custom project types can be added for tenant-specific engagement categories.
Solution Type Management
The Solution Type tab manages the catalog of solution types that can be tagged to projects for categorization and reporting.
- Create, edit, and deactivate solution types.
- Solution types appear in the project creation wizard Scope and Timeline step.
Access control
- Privilege key: settings-project-settings.
- Hidden = card not shown. Read = view only. Read and Edit = full configuration access.
7. Role Privileges
Role Privileges is the access control center for the entire BriefSpec tenant. It defines what each user role can see and do across every feature area. All Settings cards, project actions, and workspace module capabilities are governed by the privilege levels assigned here.
Navigation: Settings > Role Privileges.
Roles
- Roles are named groups (for example Application Admin, Project Manager, Author, Tester, Client User).
- The Tenant role is a special built-in role; it cannot be deleted.
- Administrators can create custom roles, clone from existing roles, and rename roles.
- Each role can be set Active or Inactive. Inactive roles cannot be assigned to new users.
- A role can be reset to its default privilege configuration using the Reset to Default action.
Privilege levels
Each privilege key supports three levels:
- Hidden – the feature or UI element is not visible to users in this role.
- Read Only (Read) – the feature is visible and buttons may appear, but create, edit, and delete actions are disabled.
- Read and Edit – full access to the feature including create, update, and delete actions.
Scope levels
Some privileges also support a scope qualifier:
- All – the user can access all records regardless of ownership.
- Own – the user can only access records they created or that are assigned to them.
Privilege areas
Privilege keys are grouped by functional area. Key areas include:
- Settings – controls visibility and access to each Settings card (settings-software-management, settings-project-template, settings-role-privileges, settings-project-settings, settings-miscellaneous, settings-manage-subscription-plan, settings-openai-key, settings-testcase-library).
- Project Management – manage-projects, project-add, project-update, project-delete, project-template-view/add/update/delete.
- Backlog – view, create, update, delete, and export requirements and user stories.
- Defects – view, create, update, delete, and export defect records.
- Test Cases – view, create, update, delete, and manage test cases and test scripts.
- Test Cycles – view, create, update, delete, and manage test cycles and sections.
- Service Requests – view, create, update, delete, and manage service requests.
- Action Items – view, create, update, delete, and manage action items.
- Phases – view, create, update, and delete project phases and phase requirements.
- Analytics / Dashboard – view and interact with project analytics dashboards.
- Client Management – manage client records and client user assignments.
Creating and cloning roles
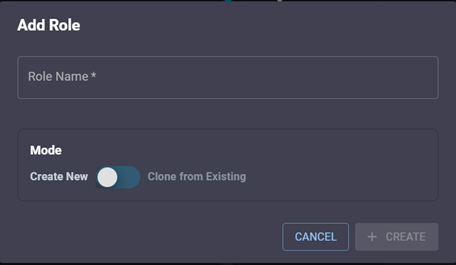
- Click Add Custom Role to create a new role from scratch or clone from an existing role.
- Supply a unique Role Name.
- Toggle Create New or Clone From Existing to copy privilege settings from an existing role as the starting point.
- After creation, individually adjust privilege levels for each feature key.
Access control
- Privilege key: settings-role-privileges.
- This is one of the highest-impact settings areas; it should be managed only by Tenant Administrators and Application Admins.
8. Miscellaneous
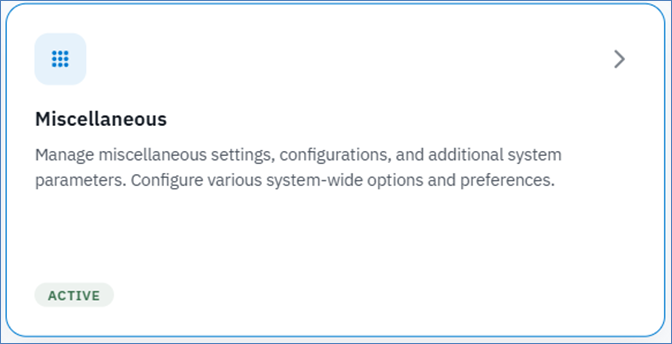
The Miscellaneous settings area is a multi-tab configuration panel for tenant-wide lookup data. These lookups populate dropdown fields on project records, support organizational reporting, and drive billing and resource calculations across the platform.
Navigation: Settings > Miscellaneous.
Navigation tabs
The Miscellaneous page is organized into the following tabs :
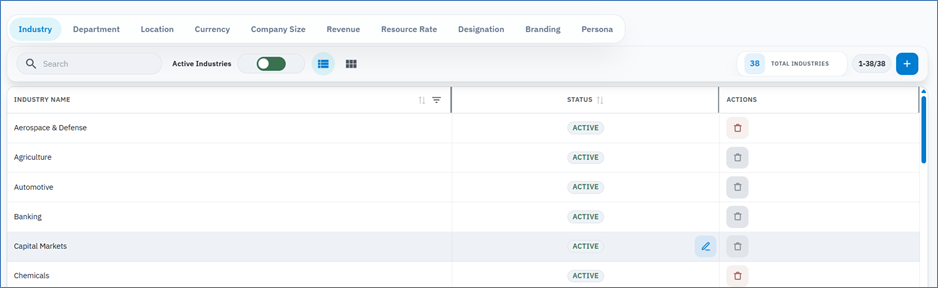
- Industry – manage the list of industries used to categorize clients and projects.
- Department – manage internal department names used in team and user management.
- Location – manage office or delivery location names for team assignments and reporting.
- Currency – Setup and manage currency details
- Company Size – manage company size categories (for example Small, Medium, Large, Enterprise) used in client records. Each entry has a display order for consistent ordering in dropdowns.
- Revenue – manage revenue bands or revenue-related lookup data for client and project reporting.
- Resource Rate – manage resource rate definitions used for effort cost calculations.
- Designation – manage employee designation or job title classifications.
- Persona – Setup Personas used in projects for the Tenat
Common operations across all tabs
- Add – create a new lookup entry. Required fields vary by type (Name is always required; Display Order is required for Company Size).
- Inline Edit – click a field in the list to edit it in place without opening a dialog.
- Active/Inactive toggle – switch an entry between active (visible in dropdowns) and inactive (hidden from dropdowns but retained for historical records).
- Delete – remove an entry. Deletion is blocked if the entry is referenced by existing records.
- Search – filter the list by name.
- Active/Inactive filter toggle – switch the list view between active and inactive entries.
Validation rules
- Name fields are required and must be unique within the same category.
- Display order for Company Size must be a positive number and must not duplicate an existing order value.
- Entries referenced by live records cannot be deleted; set them to Inactive instead.
Access control
- Privilege key: settings-miscellaneous.
- Hidden = card not shown. Read = view only. Read and Edit = full CRUD across all tabs.
9. OpenAI Key
The OpenAI Key settings area allows a tenant to configure their own OpenAI API key, overriding the platform-default key for all AI-powered features within the tenant. This is an optional advanced configuration for tenants who require dedicated API capacity, usage isolation, or specific model access.
Navigation: Settings > OpenAI Key.
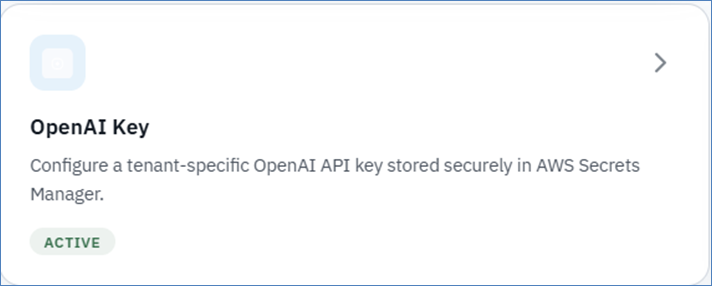
This card is plan-gated. It appears only when configure_own_openai_key is enabled on the tenant plan and AI features are active for the tenant.
Key configuration
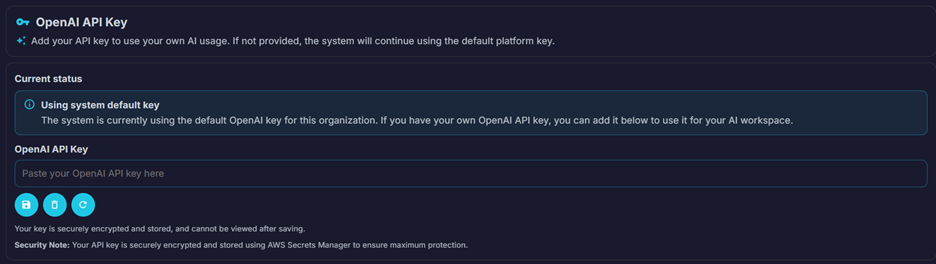
- Paste your OpenAI API key into the input field and click Save Tenant Key.
- The key is stored securely and used for all AI API calls made within this tenant.
- Delete Tenant-Specific Key – removes the custom key and reverts to the platform-default OpenAI configuration.
- Refresh Key Status – reloads the current saved key status without reloading the page.
Impact on AI features
- When a tenant key is active, all AI-assisted generation (user stories, test scripts, parent-child linkage, transcript processing, and software hierarchy generation) routes through the tenant key.
- Token consumption is tracked against the tenant API key and the platform plan token limit.
Access control
- Privilege key: settings-openai-key.
- Plan entitlement: configure_own_openai_key must be active.
- AI features must be enabled for the tenant by the platform operator for this card to function.
10. AI Token Usage
The AI Token Usage widget is displayed prominently at the top of the Settings landing page for users whose role includes visibility of the Role Privileges feature. It provides an at-a-glance view of the tenant AI token budget consumption.
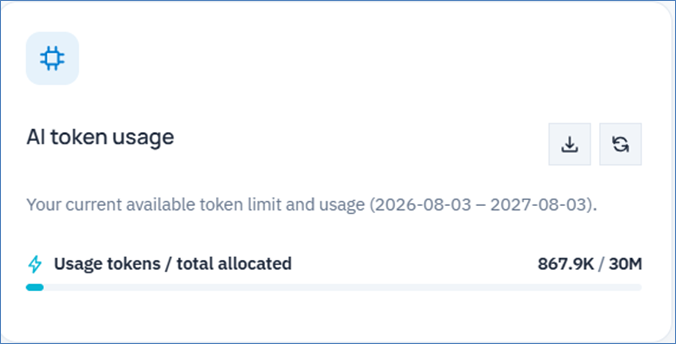
What it shows
- Usage tokens consumed – the number of AI tokens used in the current plan period.
- Total allocated – the total AI token budget assigned by the current subscription plan (plan_token_limit).
- A visual indicator of consumption relative to the limit.
- Refresh button – fetches the latest token usage data from the platform.
Context for App Admins
- Monitor token consumption regularly to avoid unexpected limits on AI features for project teams.
- If token usage is approaching the plan limit, consider purchasing an add-on top-up via Settings > Manage Plan > Add-on Purchase, or contact the BriefSpec team to review the plan.
- When a tenant-specific OpenAI key is configured (Settings > OpenAI Key), token tracking is still reported on this widget for platform-level visibility.
11. SSO Configuration
The SSO Configuration settings area allows Application Administrators to connect BriefSpec to the organization’s identity provider using OpenID Connect (OIDC). Enterprise SSO enables users with verified company email domains to sign in through Microsoft Entra, Okta, or a generic OIDC provider.
Navigation: Settings > SSO Configuration.
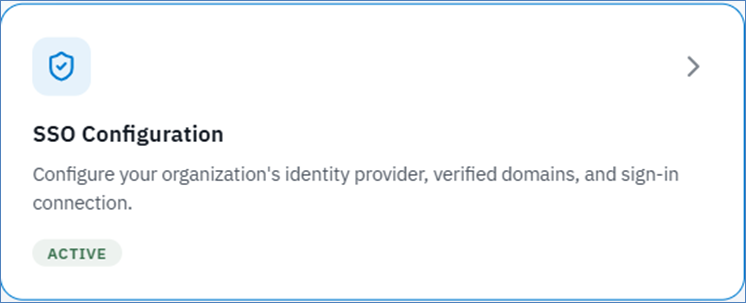
This card is plan-gated. It appears when enterprise_sso is enabled on the tenant subscription plan.
What SSO Configuration controls
- Connection status – shows whether Enterprise SSO is draft, testing, active, disabled, or in error, along with the last connection test result and last updated date.
- Provider settings – configure the OIDC connection: display name, provider preset (Microsoft Entra, Okta, or Generic OIDC), issuer URL, discovery URL, client ID, optional email fallback claim, and account prompt.
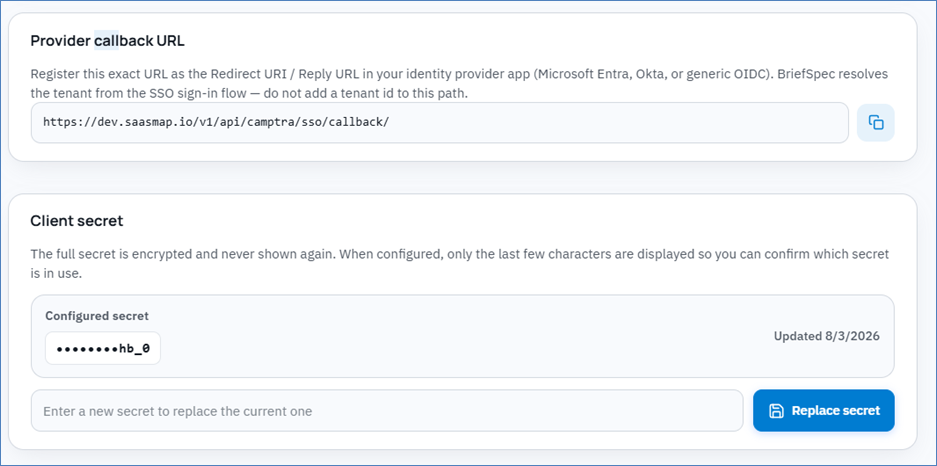
- Provider callback URL – the Redirect URI / Reply URL to register in the identity provider app registration. Copy this value exactly into the provider; BriefSpec resolves the tenant during the SSO sign-in flow.
- Client secret – store the identity provider client secret securely. The full secret is encrypted and is not shown again after save; only a masked hint of the last few characters is displayed when configured.
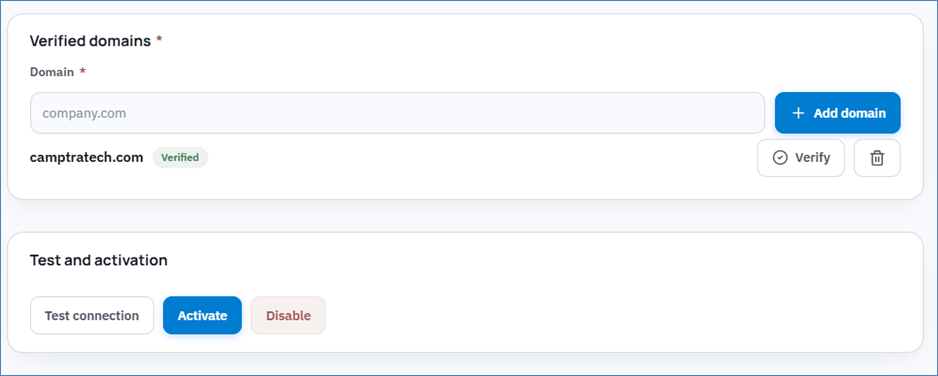
- Verified domains – add company email domains, publish the displayed DNS TXT record, and verify ownership before activation.
- Test and activation – test the connection, review activation requirements, then activate or disable Enterprise SSO for the tenant.
Setup instructions
- Click the information icon on the SSO Configuration page to open the OIDC setup instructions drawer. This includes sample issuer and discovery URL formats for Microsoft Entra and Okta, provider registration guidance, and domain verification steps.
- Enterprise SSO signs in existing BriefSpec users only. It does not create users, tenants, or memberships automatically. Users must already exist in BriefSpec with an email address matching a verified domain.
Typical setup workflow
- Configure provider settings and click Save.
- Register the provider callback URL in the identity provider application.
- Enter and save the client secret.
- Add and verify at least one company email domain.
- Test the connection, then activate Enterprise SSO.
- Below is an image of the SSO Configuration card on the Settings landing page.
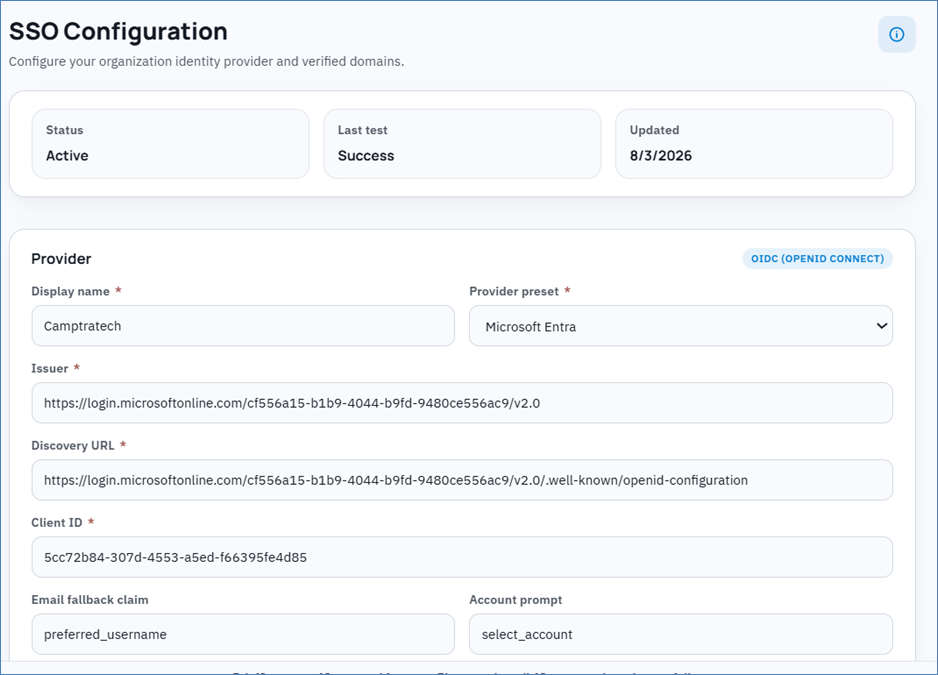
- Below is an image of the SSO Configuration provider and callback URL settings.
Access control
- Privilege key: settings-enterprise-sso.
- Plan entitlement: enterprise_sso must be active for full configuration access.
- Typical: Read and Edit for Tenant Administrators and authorized Application Administrators; Hidden for roles that should not manage authentication settings.
12. Role-Based Access Reference
Every Settings card is governed by a privilege key configured in Settings > Role Privileges. The table below summarizes the key, the card it controls, and typical access patterns for App Admins.
Privilege key summary
- settings-software-management – Software Management card. Typical: Read and Edit for App Admins; Hidden for project-only roles.
- settings-testcase-library – Testcase Library card. Plan-gated; visible only when the test_case_library_module entitlement is active.
- settings-project-template – Project Templates card. Sub-keys control view/add/update/delete individually.
- settings-project-settings – Project Settings card. Typical: Read and Edit for App Admins.
- settings-role-privileges – Role Privileges card. Restrict to Tenant Administrators only.
- settings-manage-subscription-plan – Manage Plan card. Restrict to authorized billing contacts and Tenant Admins.
- settings-miscellaneous – Miscellaneous card. Typical: Read and Edit for App Admins.
- settings-openai-key – OpenAI Key card. Plan-gated; restrict to Tenant Admins with the configure_own_openai_key entitlement.
Recommended access pattern for Application Admins
- Software Management – Read and Edit.
- Project Templates – Read and Edit (all sub-keys).
- Project Settings – Read and Edit.
- Role Privileges – Read and Edit (grant with caution).
- Manage Plan – Read and Edit or Read Only depending on billing responsibility.
- Miscellaneous – Read and Edit.
- Testcase Library – Read and Edit (when plan includes the feature).
- OpenAI Key – Read and Edit (when plan includes the feature).
13. Common Messages and Troubleshooting
- You do not have permission to view this screen – your role lacks the relevant settings privilege key; ask the Tenant Administrator to update Role Privileges.
- To access this feature, please upgrade your plan – the card is plan-gated and the current subscription does not include the feature; contact BriefSpec sales or use Manage Plan to upgrade.
- AI-powered features are currently disabled for this tenant – the tenant AI flag is off; contact the BriefSpec platform team or your organization administrator to request AI enablement.
- Loading your plan and role access. Please wait – the Settings page is fetching privilege and plan data; wait for the loading overlay to clear before clicking cards.
- Failed to load software / Failed to load software hierarchy – a network or API error occurred in Software Management; refresh the page and verify connectivity.
- Department / Location / Currency / Company Size is in use – the lookup entry is referenced by existing records and cannot be deleted; set it to Inactive instead.
- Display order already exists – choose a unique positive integer for Company Size display order.
- Role Name is required – provide a non-empty name when creating a custom role in Role Privileges.
- Failed to save OpenAI key – verify the key format (begins with sk-) and that the key is valid in the OpenAI platform.
- Unable to load Stripe billing catalog – a temporary error loading plan pricing data in Manage Plan; refresh the page or contact support.
- Name is required (Project Templates) – the template name field cannot be empty when creating a custom template.
14. Recommended Practices
- Configure Software Management before creating any projects. Pillars and epics must exist in the catalog before they can be added to project scope.
- Set up Role Privileges early and limit who has Read and Edit access to sensitive areas (Role Privileges itself, Manage Plan, and OpenAI Key).
- Use descriptive names for custom roles, project types, solution types, and software entries that reflect real organizational terminology.
- Maintain the Miscellaneous lookup data regularly. Inactive entries remain in historical records but are hidden from new record dropdowns, keeping lists clean.
- Publish project templates only when fully validated. Cloning a Published template to a new Draft is the safe way to make structural changes without affecting active projects.
- Monitor AI Token Usage on the Settings landing page and review Manage Plan utilization metrics monthly.
- Use Import Software Hierarchy from Excel for bulk catalog setup rather than entering entries one by one.
- When retiring a project type, solution type, or other lookup item, set it to Inactive rather than deleting it to preserve historical record integrity.
- Coordinate Role Privilege changes with project managers and team leads before applying them, as changes take effect immediately and can affect in-progress project work.
- Before downgrading a plan, review the Manage Plan utilization metrics to identify which limits would be exceeded and plan the cleanup of excess custom templates, fields, or users accordingly.
Appendix
The following appendices provide quick reference information for Application Administrators.
Appendix A: Settings Card Summary
Target audience: App Admins performing a first-time setup or reviewing tenant configuration coverage.
- Manage Plan – subscription tier, billing, utilization quotas. Privilege: settings-manage-subscription-plan.
- Miscellaneous – lookup catalogs (Industry, Department, Location, Currency, Company Size, Project Type, Solution Type, Revenue, Resource Rate, Designation). Privilege: settings-miscellaneous.
- OpenAI Key – tenant custom AI API key. Privilege: settings-openai-key. Plan-gated: configure_own_openai_key.
- Project Settings – per-module defaults and Project Type / Solution Type management. Privilege: settings-project-settings.
- Project Templates – module configuration templates governing project workspace and record forms. Privilege: settings-project-template.
- Role Privileges – role and feature-level access control. Privilege: settings-role-privileges.
- Software Management – software platform and pillar/epic catalog; business processes. Privilege: settings-software-management.
- Testcase Library – industry test case catalog for import into projects. Privilege: settings-testcase-library. Plan-gated: test_case_library_module.
- AI Token Usage (widget) – live token consumption display. Shown when settings-role-privileges is visible.
Appendix B: Privilege Key Reference
Target audience: Tenant Administrators configuring Role Privileges for Settings access.
- settings-software-management: Software Management card visibility and access.
- settings-testcase-library: Testcase Library card visibility and access.
- settings-project-template: Project Templates card visibility.
- project-template-view: Open Project Templates page.
- project-template-add: Create new custom templates.
- project-template-update: Edit templates, toggle Active, inline edits.
- project-template-delete: Delete Draft templates with no linked projects.
- settings-project-settings: Project Settings card visibility and access.
- settings-role-privileges: Role Privileges card visibility and access.
- settings-manage-subscription-plan: Manage Plan card visibility and access.
- settings-miscellaneous: Miscellaneous card visibility and access.
- settings-openai-key: OpenAI Key card visibility and access.
Appendix C: Plan Entitlement Keys
Target audience: Tenant Administrators and billing contacts reviewing plan feature availability.
- test_case_library_module: Enables the Testcase Library card in Settings.
- configure_own_openai_key: Enables the OpenAI Key card in Settings.
- no_of_custom_templates: Maximum global custom templates allowed.
- no_of_custom_fields_for_template: Maximum custom fields in Custom Layout sections across active templates.
- plan_token_limit: Monthly AI token budget for the tenant.
Appendix D: First-Time Setup Checklist for App Admins
Target audience: New Application Administrators setting up a BriefSpec tenant.
- 1. Configure Role Privileges for all intended roles (including the App Admin role itself).
- 2. Set up Software Management – add software platforms, pillars, and modules/epics in scope.
- 3. Configure Miscellaneous lookups – set up Industries, Departments, Locations, Currencies, and Company Sizes.
- 4. Configure Project Type and Solution Type catalogs in Miscellaneous or Project Settings.
- 5. Create or review Project Templates – clone system templates and configure modules, fields, and statuses.
- 6. Review Manage Plan to confirm subscription limits are sufficient before onboarding users and projects.
- 7. Configure the OpenAI Key if the tenant requires a dedicated API key (plan-gated).
- 8. Add users and assign roles with the appropriate privilege levels.
- 9. Create initial projects and assign project templates, pillars, and team members.
Appendix E: Related Settings Cross-Reference
Target audience: All administrators navigating between settings areas.
- Project Type and Solution Type – available in both Settings > Miscellaneous and Settings > Project Settings.
- Project Templates – created in Settings > Project Templates; also accessible from Edit Project > Settings step.
- Role Privileges – applies globally to all features; changes take effect immediately for all users in the role.
- Software Management pillars and epics – referenced in project creation, Backlog, Defects, Service Requests, Test Cases, and AI generation workflows.
- Plan limits – visible in Settings > Manage Plan; enforced across project creation, template creation, and custom field additions.